Edit Mode For Phone Numbers
Up to here , final UI is shown below:
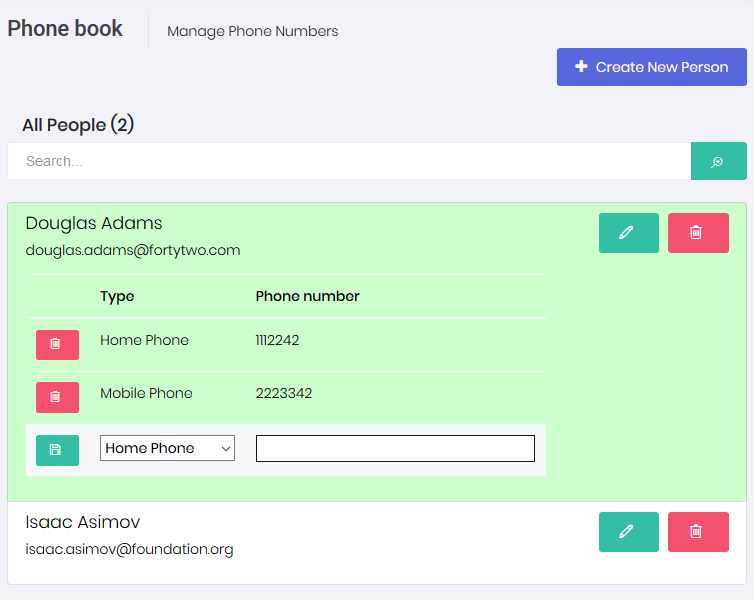
When we click the green edit icon for a person, its row is expanded and all phone numbers are shown. Then we can delete any number by clicking the icon at left. We can add a new phone from the inputs at last line.
View
Changes in view are shown below:
<div id="AllPeopleList" class="list-group">
    @foreach (var person in Model.Items)
    {
        <a href="javascript:;" class="list-group-item" data-person-id="@person.Id">
            <h4 class="list-group-item-heading">
                @person.Name @person.Surname

                <span class="person-buttons">
                    <button title="@L("Edit")" class="btn btn-circle btn-icon-only green edit-person">
                        <i class="la la-pencil"></i>
                    </button>
                    @if (IsGranted(AppPermissions.Pages_Tenant_PhoneBook_DeletePerson))
                    {
                        <button title="@L("Delete")" class="btn btn-circle btn-icon-only red delete-person" href="javascript:;">
                            <i class="la la-trash"></i>
                        </button>
                    }
                </span>
            </h4>
            <p class="list-group-item-text">
                @person.EmailAddress
            </p>
            <div class="table-scrollable table-phones">
                <table class="table table-hover">
                    <thead>
                        <tr>
                            <th style="width:10%"></th>
                            <th style="width:15%">@L("Type")</th>
                            <th style="width:75%">@L("PhoneNumber")</th>
                        </tr>
                    </thead>
                    <tbody>
                        @foreach (var phone in person.Phones)
                        {
                            @Html.Partial("_PhoneRowInPersonList", new PhoneRowInPersonListViewModel(phone))
                        }
                        <tr>
                            <td>
                                <button class="btn btn-sm green button-save-phone">
                                    <i class="la la-floppy-o"></i>
                                </button>
                            </td>
                            <td>
                                <select name="Type">
                                    <option value="0">@L("PhoneType_Mobile")</option>
                                    <option value="1">@L("PhoneType_Home")</option>
                                    <option value="2">@L("PhoneType_Business")</option>
                                </select>
                            </td>
                            <td><input type="text" name="Number" /></td>
                        </tr>
                    </tbody>
                </table>
            </div>
        </a>
    }
</div>
We added an edit button for each person. Then added a table for each person that shows phones of the related person and allows adding a new phone. Phones table is only shown if we click the edit button. This is implemented using a bit CSS and javascript (we will see in next sections).
One important thing here is we rendered phone rows in a partial view. This is done to make this part re-usable. Because we will use the same partial view when we create a new phone. The _PhoneRowInPersonList partial view is here:
@model Acme.PhoneBookDemo.Web.Areas.App.Models.PhoneBook.PhoneRowInPersonListViewModel
<tr data-phone-id="@Model.Phone.Id">
    <td>
        <button class="btn btn-sm default button-delete-phone">
            <i class="la la-trash"></i>
        </button>
    </td>
    <td>@Model.GetPhoneTypeAsString()</td>
    <td>@Model.Phone.Number</td>
</tr>
And the PhoneRowInPersonListViewModel is here:
public class PhoneRowInPersonListViewModel
{
    public PhoneInPersonListDto Phone { get; set; }

    public PhoneRowInPersonListViewModel(PhoneInPersonListDto phone)
    {
        Phone = phone;
    }

    public string GetPhoneTypeAsString()
    {
        return LocalizationHelper.GetString(PhoneBookDemoConsts.LocalizationSourceName, "PhoneType_" + Phone.Type);
    }
}
Styles
Changed Index.less a bit to adapt to the changed view:
#AllPeopleList {
    .list-group-item-heading {
        span.person-buttons {
            float: right;
        }
    }

    .table-phones {
        display: none;
    }

    .person-editing {
        background-color: #ccffcc;

        h4 {
            font-weight: bold;
        }

        .table-phones {
            display: table;
        }
    }
}
Scripts
Added following codes into Index.js:
//Edit person button
$('#AllPeopleList button.edit-person').click(function (e) {
    e.preventDefault();

    var $listItem = $(this).closest('.list-group-item');

    $listItem
        .toggleClass('person-editing')
        .siblings().removeClass('person-editing');
});

//Save phone button
$('#AllPeopleList .button-save-phone').click(function (e) {
    e.preventDefault();

    var $phoneEditorRow = $(this).closest('tr');

    abp.ajax({
        url: abp.appPath + 'App/PhoneBook/AddPhone',
        dataType: 'html',
        data: JSON.stringify({
            personId: $phoneEditorRow.closest('.list-group-item').attr('data-person-id'),
            Type: $phoneEditorRow.find('select[name=Type]').val(),
            Number: $phoneEditorRow.find('input[name=Number]').val()
        })
    }).done(function (result) {
        $(result).insertBefore($phoneEditorRow);
    });
});

//Delete phone button
$('#AllPeopleList').on('click', '.button-delete-phone', function (e) {
    e.preventDefault();

    var $phoneRow = $(this).closest('tr');
    var phoneId = $phoneRow.attr('data-phone-id');

    _personService.deletePhone({
        id: phoneId
    }).done(function () {
        abp.notify.success(app.localize('SuccessfullyDeleted'));
        $phoneRow.remove();
    });
});
When click to 'edit person' button, we simple open/close (toggle) the phones table of related person by using css classes.
In the 'save phone' button's click, we make an AJAX request to PhoneBookController's AddPhone action. Server returns an HTML which is then inserted to the table. That's why we did this part partial (We will see PhoneBookController.AddPhone action in the next section).
Lastly, we deleting the phone when clicking to the 'delete phone' button and remove the related phone row (tr) from DOM. Notice the event registration here. We used on function of jquery. Thus, the selector becomes live. That means, if we add new elements to the page and any element matches to the selector, its click event is automatically binded.
AddPhone Action
We added AddPhone action to the PhoneController as shown below:
[HttpPost]
public async Task<PartialViewResult> AddPhone([FromBody]AddPhoneInput input)
{
    PhoneInPersonListDto phoneInPersonList = await _personAppService.AddPhone(input);
    var model = new PhoneRowInPersonListViewModel(phoneInPersonList);

    return PartialView("_PhoneRowInPersonList", model);
}
It simply uses PersonAppService.AddPhone and returns _PhoneRowInPersonList partial view as response. Thus, we directly insert returning value to the table. A sample return value is shown below:
<tr data-phone-id="19">
    <td>
        <button class="btn btn-sm default button-delete-phone">
            <i class="icon-trash"></i>
        </button>
    </td>
    <td>Mobile</td>
    <td>129838172</td>
</tr>
As you see, this can be directly inserted to the table, as we already do.