Xamarin Step by Step Development
Introduction
In this document, we will create a sample Xamarin phonebook application step by step integrated with ASP.NET Zero website. Be aware that only ASP.NET Core version is supported.
Downloading Phonebook-Core Sample
In the Developing Step By Step document we have already seen how to create a phonebook on server side and web client. In this document we will resume this project. We will build a phonebook application on ASP.NET Zero Xamarin project. Download the solution Acme.PhoneBookDemo and open the Acme.PhoneBookDemo.Mobile.sln file.
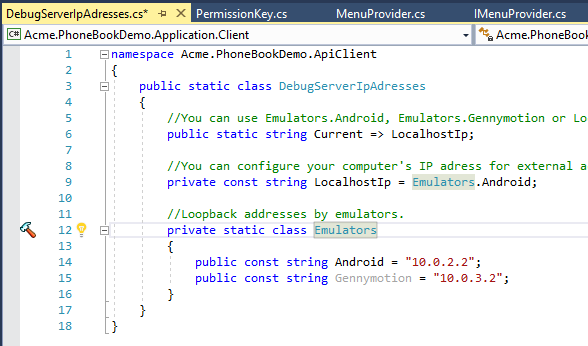
Configuring Host Address
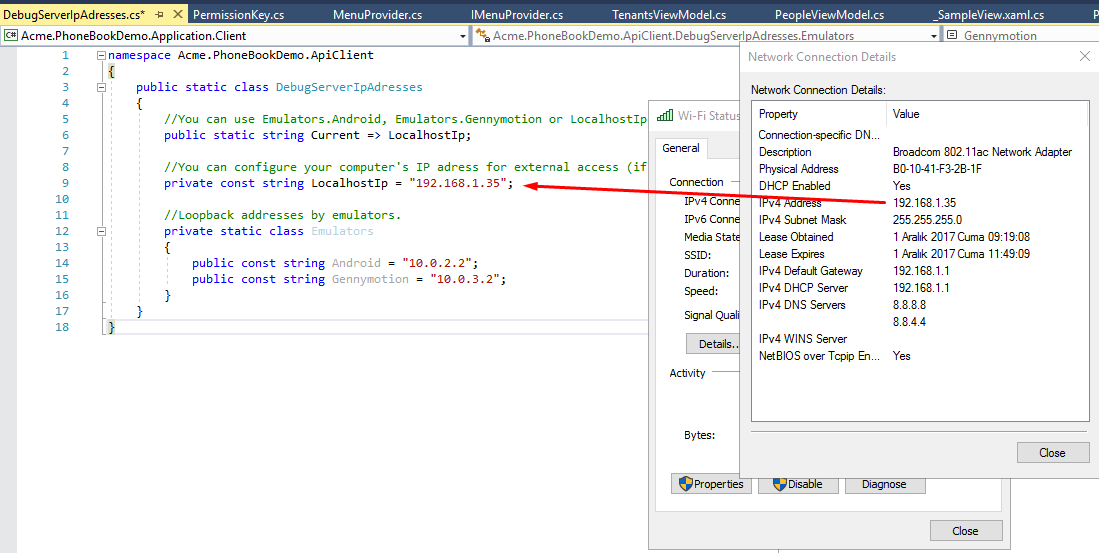
If you are using an emulator, you can use the emulator's loopback address to reach your local computer. Eg: for Android emulator, it's 10.0.2.2
Creating Phonebook Application Service Proxy
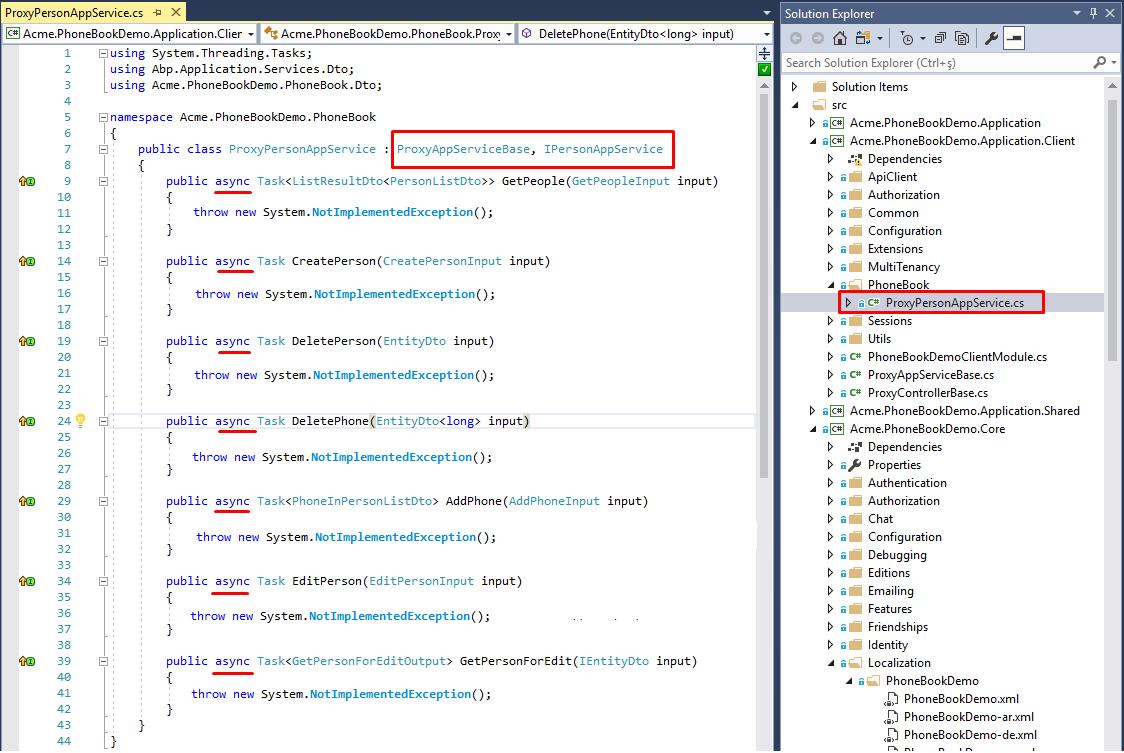
To consume server API methods, we need to implement the IPersonAppService application service over HTTP transmission. Create a new folder called PhoneBook in Acme.PhoneBookDemo.Application.Client project.
Then create a new class called ProxyPersonAppService in the PhoneBook folder. Derive ProxyPersonAppService from ProxyAppServiceBase, IPersonAppService interface. Visual Studio will help us to add all unimplemented methods from IPersonAppService at once.
Add async keyword to all methods to be able to benefit from multi-tasking.
Implementing App Service Methods
In the ProxyAppServiceBase class you'll see ApiClient, which is being used to call host web API methods. We'll use ApiClient to transfer data with host.
ApiClient has post, put, get, delete HTTP methods. To decide which needs to be called for the corresponding method you can read ASP.NET Boilerplate Application Services as Controllers.
To summarize that document: ASP.NET Boilerplate framework uses ConventionalHttpVerbs by default. This means there's a naming convention while implementing app service methods. When method name starts with:
- Get => ApiClient.GetAsync<T>(...);
- Put or Update => ApiClient.PutAsync<T>(...);
- Delete or Remove => ApiClient.DeleteAsync<T>(...);
- Post, Create or Insert => ApiClient.PostAync<T>();
- If none of the above => Post is used as default.
Based on the above information, we will implement the methods. The first method is GetPeople, it starts with Get prefix, so we have to use ApiClient.GetAsync(...) method.
GetEndPoint(...) adds the method name as a segment for the target host web API url. You have to pass the name of the application service method to GetEndPoint():
public async Task<ListResultDto<PersonListDto>> GetPeople(GetPeopleInput input)
{
    return await ApiClient.GetAsync<ListResultDto<PersonListDto>>(GetEndpoint(nameof(GetPeople)), input);
}
Do the same for other methods. The final view of ProxyPersonAppService class should be like this:
public class ProxyPersonAppService : ProxyAppServiceBase, IPersonAppService
{
    public async Task<ListResultDto<PersonListDto>> GetPeople(GetPeopleInput input)
    {
        return await ApiClient.GetAsync<ListResultDto<PersonListDto>>(GetEndpoint(nameof(GetPeople)), input);
    }

    public async Task CreatePerson(CreatePersonInput input)
    {
        await ApiClient.PostAync(GetEndpoint(nameof(CreatePerson)), input);
    }

    public async Task DeletePerson(EntityDto input)
    {
        await ApiClient.DeleteAsync(GetEndpoint(nameof(DeletePerson)), input);
    }

    public async Task DeletePhone(EntityDto<long> input)
    {
        await ApiClient.DeleteAsync(GetEndpoint(nameof(DeletePhone)), input);
    }

    public async Task<PhoneInPersonListDto> AddPhone(AddPhoneInput input)
    {
        return await ApiClient.PostAync<PhoneInPersonListDto>(GetEndpoint(nameof(AddPhone)), input);
    }

    public async Task EditPerson(EditPersonInput input)
    {
        await ApiClient.PostAync(GetEndpoint(nameof(EditPerson)), input);
    }

    public async Task<GetPersonForEditOutput> GetPersonForEdit(IEntityDto input)
    {
        return await ApiClient.GetAsync<GetPersonForEditOutput>(GetEndpoint(nameof(GetPersonForEdit)), input);
    }
}
When we complete the communication phase with the host service, we can start to create person and person detail view for mobile.
Note that "Page" and "View" words are used for same meaning and purpose to refer to XAML files.
Firstly we'll create view, then view-model. But it's up to you which side you start. Let's create PeopleView.xaml.
Creating People Page
Creating PeopleView
PeopleView is going to list all the persons. When we tap one of the
person, we'll navigate to person details. The person details page will
contain personal information and phone numbers of person. In Acme.PhoneBookDemo.Mobile.Shared project, there's Views
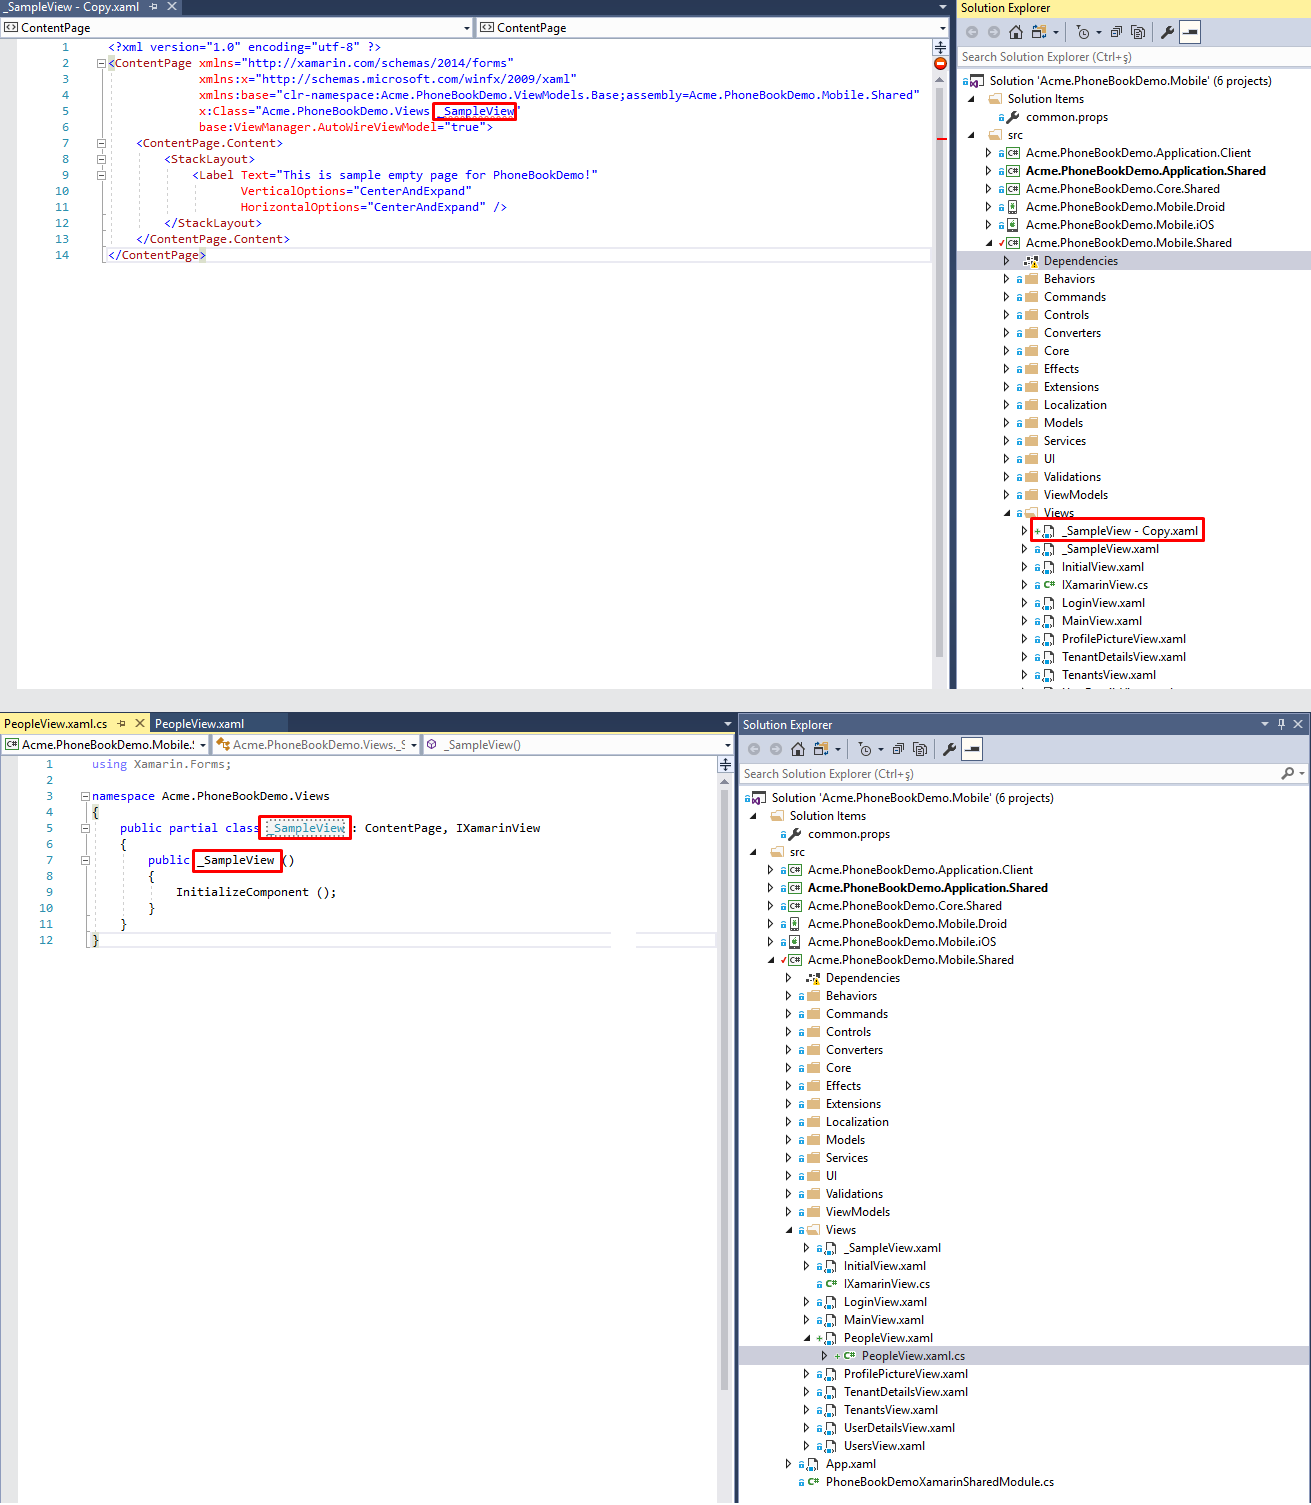
folder. All the pages must be located in Views folder. You can create a new empty Content Page as below, but in this example
we'll copy and paste _SampleView.xaml file.
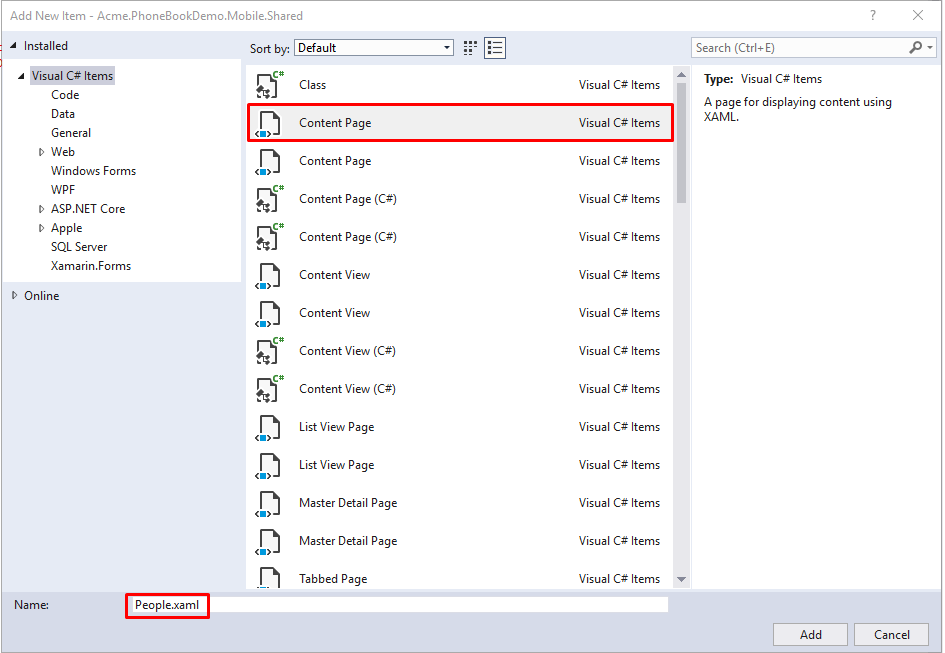
Copy and paste _SampleView.xaml into the same folder. We'll rename the file. All the views must end with "View" postfix. This is mandatory for auto matching related view-model. So rename _SampleView - Copy.xaml to PeopleView.xaml.
After copy/paste, you have to rename the following for PeopleView.xaml as well:
- The class name in xaml: x:Class="Acme.PhoneBookDemo.Views._SampleView" > x:Class="Acme.PhoneBookDemo.Views.PeopleView"
- The class name in xaml.cs: public partial class _SampleView > public partial class PeopleView
- The constructor of xaml.cs: public _SampleView() > public PeopleView()
We have created an empty view. To control this view, we have to create view-model for this view. Next step is creating view-model of PeopleView.xaml.
Creating PeopleViewModel
ASP.NET Zero Xamarin app uses MVVM pattern. So each view should have a view-model. According to conventional view-model binding, view-model file names must end with "ViewModel" postfix.
So the view-model name for PeopleView must be PeopleViewModel. All view-models must be located in ViewModels folder.
You can create a new class called PeopleViewModel in ViewModels folder. But as we did for the view, we'll use the empty template view-model called _SampleViewModel.cs.
Copy and paste _SampleViewModel.cs and rename the following:
- The view-model filename: _SampleViewModel - Copy.cs > PeopleViewModel.cs
- The constructor of view-model: public class _SampleViewModel : XamarinViewModel > public class PeopleViewModel : XamarinViewModel
Thus far we have implemented the proxy class for PersonAppService, created People view and created view-model PeopleViewModel.
To be able to see the new view in the app, there's one more thing to do: adding this page to the navigation menu.
Adding People Page to Navigation Menu
To add a new menu item, open MenuProvider class in Acme.PhoneBookDemo.Mobile.Shared project. The navigation menu items are stored in a ObservableRangeCollection. This is for notifying view whenever an item changes in the collection.
Add the new NavigationMenuItem in the list like below:
public class MenuProvider : ISingletonDependency, IMenuProvider
{
    private readonly ObservableRangeCollection<NavigationMenuItem> _menuItems = new ObservableRangeCollection<NavigationMenuItem>
    {
        new NavigationMenuItem
        {
            Title = L.Localize("Tenants"),
            Icon = "Tenants.png",
            ViewType = typeof(TenantsView),
            RequiredPermissionName = PermissionKey.Tenants,
        },
        new NavigationMenuItem
        {
            Title = L.Localize("Users"),
            Icon = "UserList.png",
            ViewType = typeof(UsersView),
            RequiredPermissionName = PermissionKey.Users,
        },
        new NavigationMenuItem
        {
            Title = L.Localize("PhoneBook"),
            Icon = "ic_contact_phone_black_24dp.png",
            ViewType = typeof(PeopleView),
            RequiredPermissionName = PermissionKey.Phonebook
        }
        ...
    }
}
Let's set the properties of the new NavigationMenuItem:
Title: It's already localized in the Developing Step By Step document. We just set localization key with this shortcut: L.Localize("PhoneBook"). And it localizes the menu text.
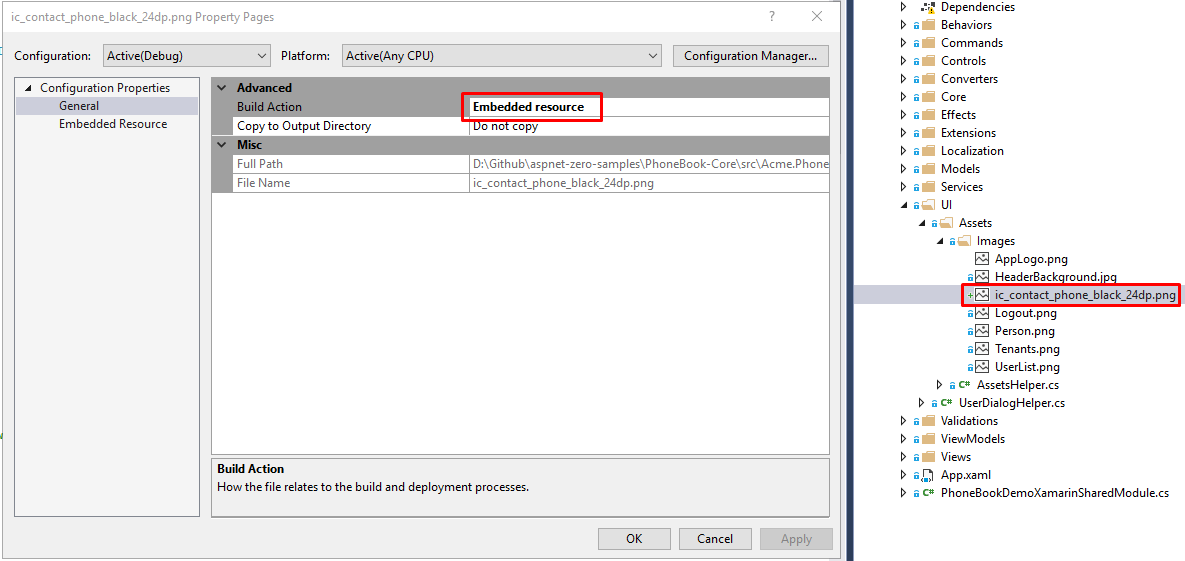
Icon: Download a related png icon file. For this example, go to https://material.io/icons/#ic_contact_phone and download PNGS. Then extract the downloaded zip file. In the zip file, you can use ic_contact_phone_black_24dp\android\drawable-xxhdpi\ic_contact_phone_black_24dp.png as the icon. Copy and paste the file into UI\Assets\Images folder in the Acme.PhoneBookDemo.Mobile.Shared project.
Right-click the png file and go to properties. In the Advanced section, set Build Action as Embedded resource.
This is mandatory! This will help to share the icon file across platforms.
Now set Icon property of NavigationMenuItem to "ic_contact_phone_black_24dp.png":
ViewType: Must be the class name of the view in the View folder. The view name is PeopleView, so let's set view type to typeof(PeopleView).
RequiredPermissionName: A permission key has to be assigned to be able to show/hide the new menu according to the user's permission. In the previous document, it's already declared in "Define the permission" section as "Pages.Tenant.PhoneBook". We need to use the same string for permission key. So what you have to do is add the below line to PermissionKey class like below:
public const string Phonebook = "Pages.Tenant.PhoneBook";
Let's run the application to see the new menu item.
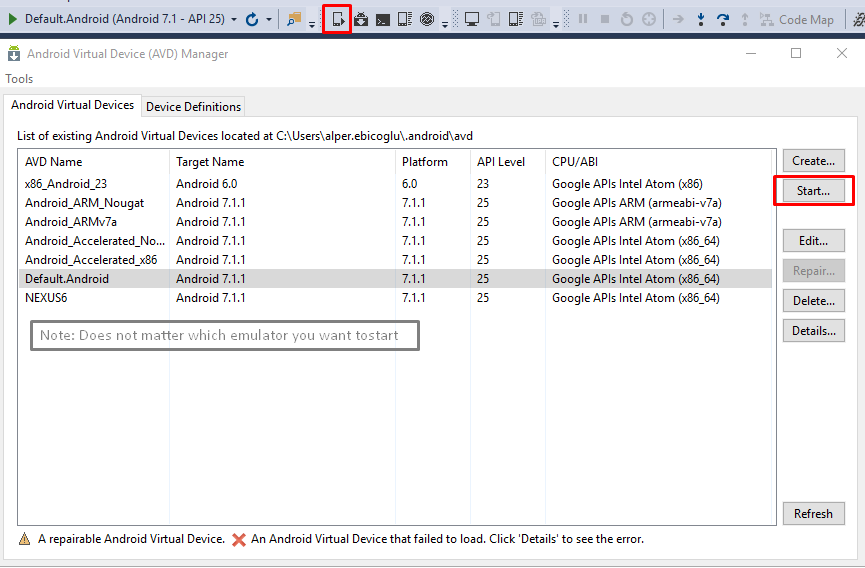
In this example, we'll use Android platform to test the sample. Hence, set the startup project to Acme.PhoneBookDemo.Mobile.Droid.
If you've already started Android emulator, you can directly run the project. But if you've not started the emulator yet, it's advised to start the emulator first from the Visual Studio Toolbar as shown below. The reason of initializing emulator is: sometimes Visual Studio cannot make initial connection to the emulator for the first run. So it's better to run it and wait until it starts up successfully. When you see the emulator home screen, you can run the project (F5).
You will see a splash screen while initializing. After that you'll see the app login page. The PhoneBook is defined on tenant side. You have to switch to a tenant to see the PhoneBook menu item. On the top-right of the screen, there's a toolbar button called Change Tenant. Tap that button and enter default into the textbox. If the tenant default is available, you will see "Current Tenant: default" label. If the tenant is not active or does not exist, then you'll get an alert about that.
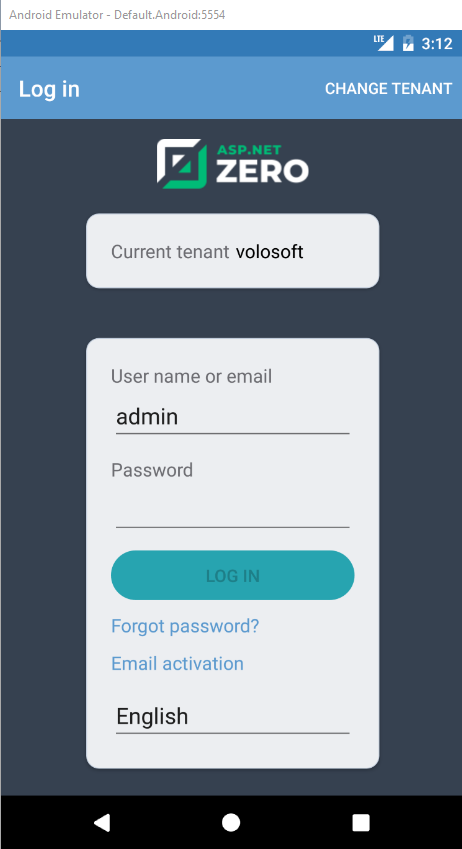
Enter your credentials and tap Log In button. If you see an alert says "You must change your password before logging on!" you need to login and change your password for the first time on the website. (Currently Xamarin app doesn't have password change screen and will be added in the next releases.)
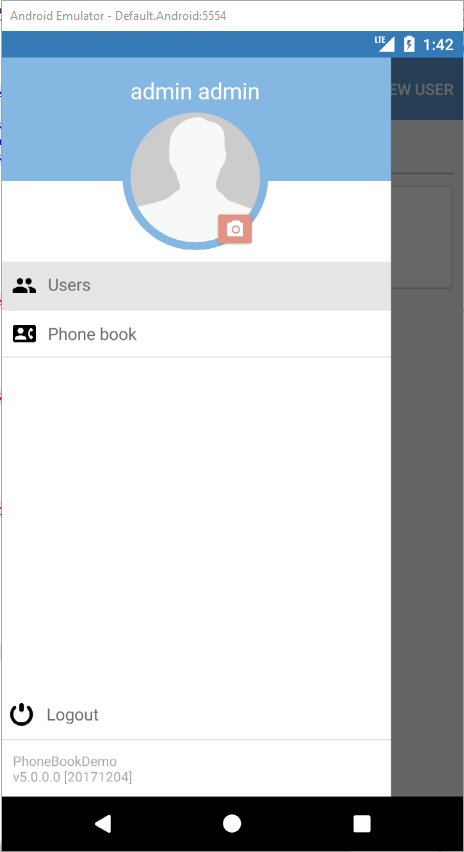
When you successfully login, you can see the below screen with new Phone book menu item.
Up to here we successfully added an empty People page. Let's populate the view with data.
Populating People View with Data
The first function is listing people in PeopleView. To list repeating items we use ListView. Open PeopleView.xaml and set title of the view:
Setting Page Title
Add title tag and namespace into ContentPage tag like below:
<ContentPage
 ...
 xmlns:extensions="clr-namespace:Acme.PhoneBookDemo.Extensions.MarkupExtensions;assembly=Acme.PhoneBookDemo.Mobile.Shared"
 Title="{extensions:Translate PhoneBook}"
 ...>
Adding ListView Item
There's a placeholder label in <ContentPage.Content> tag. Remove that Label and add the below ListView definition in ContentPage.Content tag. In the below code, we populate the Listview with Persons data. So in the view-model we need a public property Persons. Persons property must be IEnumerable and contain FullName and EmailAddress string properties. All properties that will be binded to view must be public. HasUnevenRows property automatically sizes list view rows for content. The main reason we used TextCell in DataTemplate is performance. Xamarin docs say Use the built-in cells (like TextCell / SwitchCell) instead of ViewCell whenever you can.
<ContentPage.Content>
    <ListView HasUnevenRows="True"
              SeparatorVisibility="None"
              ItemsSource="{Binding Persons}"
              SelectedItem="{Binding SelectedPerson, Mode=TwoWay}">
        <ListView.ItemTemplate>
            <DataTemplate>
                <TextCell Text="{Binding FullName}" Detail="{Binding EmailAddress}" />
            </DataTemplate>
        </ListView.ItemTemplate>
    </ListView>
</ContentPage.Content>
Persons data needs to be binded in appearing event of page. To achieve this we add a behavior to the page. Add the below code into the ContentPage tag in PeopleView.xaml. This behaviour will execute PageAppearingCommand in view-model. PageAppearingCommand will fetch data from server. For the best user experience and smooth navigation, it's better to start long-lasting operations after you show the view. Never wait the main. Do not run blocking procedures in constructor.
<?xml version="1.0" encoding="utf-8" ?>
<ContentPage ...
    xmlns:behaviors="clr-namespace:Acme.PhoneBookDemo.Behaviors;assembly=Acme.PhoneBookDemo.Mobile.Shared"
 ...>

    <ContentPage.Content>
        <ListView HasUnevenRows="True"
                  SeparatorVisibility="None"
                  ItemsSource="{Binding Persons}"
                  SelectedItem="{Binding SelectedPerson, Mode=TwoWay}">
            <ListView.ItemTemplate>
                <DataTemplate>
                    <TextCell Text="{Binding FullName}" Detail="{Binding EmailAddress}" />
                </DataTemplate>
            </ListView.ItemTemplate>
        </ListView>
    </ContentPage.Content>

    <ContentPage.Behaviors>
        <behaviors:EventHandlerBehavior EventName="Appearing">
            <behaviors:InvokeCommandAction Command="{Binding PageAppearingCommand}" />
        </behaviors:EventHandlerBehavior>
    </ContentPage.Behaviors>

</ContentPage>
The final look of PeopleView.xaml is like below:
<ContentPage xmlns="http://xamarin.com/schemas/2014/forms"
             xmlns:x="http://schemas.microsoft.com/winfx/2009/xaml"
             x:Name="PeoplePage"
             xmlns:base="clr-namespace:Acme.PhoneBookDemo.ViewModels.Base;assembly=Acme.PhoneBookDemo.Mobile.Shared"
             xmlns:behaviors="clr-namespace:Acme.PhoneBook.Behaviors;assembly=Acme.PhoneBookDemo.Mobile.Shared"
             xmlns:extensions="clr-namespace:Acme.PhoneBookDemo.Extensions.MarkupExtensions;assembly=Acme.PhoneBookDemo.Mobile.Shared"
             x:Class="Acme.PhoneBookDemo.Views.PeopleView"
             Title="{extensions:Translate PhoneBook}"
             base:ViewManager.AutoWireViewModel="true">

    <ContentPage.Content>
        <StackLayout>
            <ListView HasUnevenRows="True"
                      SeparatorVisibility="None"
                      ItemsSource="{Binding Persons}"
                      SelectedItem="{Binding SelectedPerson, Mode=TwoWay}">
                <ListView.ItemTemplate>
                    <DataTemplate>
                        <TextCell Text="{Binding FullName}" Detail="{Binding EmailAddress}" />
                    </DataTemplate>
                </ListView.ItemTemplate>
            </ListView>
        </StackLayout>
    </ContentPage.Content>

    <ContentPage.Behaviors>
        <behaviors:EventHandlerBehavior EventName="Appearing">
            <behaviors:InvokeCommandAction Command="{Binding PageAppearingCommand}" />
        </behaviors:EventHandlerBehavior>
    </ContentPage.Behaviors>

</ContentPage>
Creating People View-Model
In the PeopleView we have used Persons as items source of ListView. So PeopleViewModel class needs to have a property called Persons and a command called PageAppearingCommand.
The ProxyPersonAppService GetPeople method returns ListResultDto<PersonListDto>. It is not convenient to directly use the DTO object from server. The main reason is DTO doesn't implement INotifyPropertyChanged interface. To overcome this issue, we create a new mapping class. This mapping class is used and named as Model. Additional advantage of this model class is, you can add extra properties to use in your view. For example, you can add FullName that combines name and surname. This increases app performance by rendering less elements. So let's define the PersonListModel class. Create a new folder called Models/PhoneBook in Acme.PhoneBookDemo.Mobile.Shared project. Add a new class PersonListModel.cs into Models/PhoneBook folder. To not add all properties from the PersonListDto class, inherit the model class from PersonListDto . We need a full name in view, that's why we add a new property called FullName that joins Name and Surname. Additionally, add a [AutoMapFrom(typeof(PersonListDto))] attribute to map PersonListDto to PersonListModel. Then add Phones property with type ObservableRangeCollection<PhoneInPersonListDto>. As there's already Phones property in PersonListDto, add new keyword to the property. The complete definition of PersonListModel is like below:
[AutoMapFrom(typeof(PersonListDto))]
public class PersonListModel : PersonListDto, INotifyPropertyChanged
{
    public string FullName => Name + " " + Surname;

    public new ObservableRangeCollection<PhoneInPersonListDto> Phones { get; set; }

    public event PropertyChangedEventHandler PropertyChanged;

    [NotifyPropertyChangedInvocator]
    protected virtual void OnPropertyChanged([CallerMemberName] string propertyName = null)
    {
        PropertyChanged?.Invoke(this, new PropertyChangedEventArgs(propertyName));
    }
}
Listing People
Open PeopleViewModel class. We'll retrieve data from ProxyPersonAppService. The interface of ProxyPersonAppService is IPersonAppService. We use constructor injection to resolve IPersonAppService. Create a new async method called FetchDataAsync with FilterText parameter. Later we'll use FilterText for searching people. Try to add postfix Async to async method names. To show an indicator while we are retrieving data from server, there's a method in view-model's base class called SetBusyAsync. You can wrap your method with SetBusyAsync to show an indicator that a background job is going on. You can create an async command by using HttpRequestCommand.Create(). This is a shortcut extension to create an async command. The final look of PeopleViewModel.cs is like below:
public class PeopleViewModel : XamarinViewModel
{
    public ICommand PageAppearingCommand => HttpRequestCommand.Create(PageAppearingAsync);
    private readonly IPersonAppService _personAppService;
    private ObservableRangeCollection<PersonListModel> _persons = new ObservableRangeCollection<PersonListModel>();

    public PeopleViewModel(IPersonAppService personAppService)
    {
        _personAppService = personAppService;
    }

    public ObservableRangeCollection<PersonListModel> Persons
    {
        get => _persons;
        set
        {
            _persons = value;
            RaisePropertyChanged(() => Persons);
        }
    }

    public async Task PageAppearingAsync()
    {
        await FetchDataAsync();
    }

    public async Task FetchDataAsync(string filterText = null)
    {
        await SetBusyAsync(async () =>
        {
            var result = await _personAppService.GetPeople(new GetPeopleInput
            {
                Filter = filterText
            });

       var personListModels = ObjectMapper.Map<IEnumerable<PersonListModel>>(result.Items);
            Persons.ReplaceRange(personListModels);
        });
    }
}
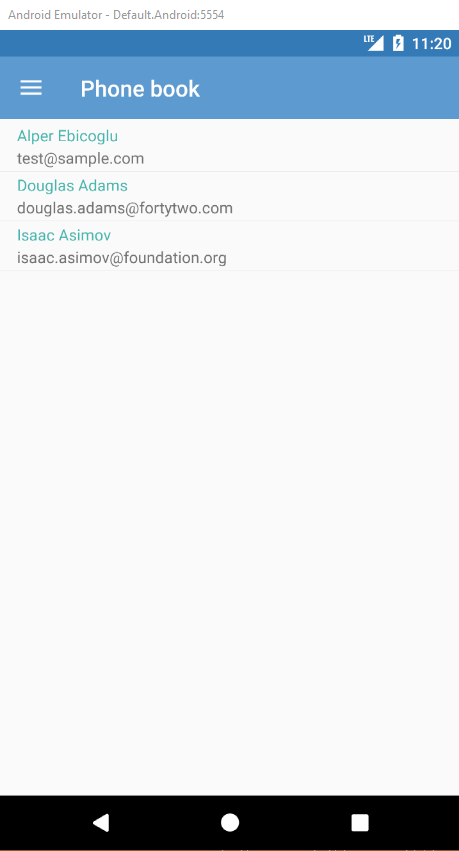
When you run the app, you'll see the below screen. (You may see no data if you've not inserted data in database. The listed data is already inserted to database.)
Searching People
To search and filter people we'll use SearchBar, which is Xamarin built-in control that provides a search textbox. Open PeopleView.xaml and add the SearchBar before the ListView control. We'll bind FilterText property to the SearchBar. If FilterText changes, it'll start to filter from server.
<?xml version="1.0" encoding="utf-8" ?>
<ContentPage ...>
    ...
    <ContentPage.Content>
        <StackLayout>
            <SearchBar Text="{Binding FilterText}" Placeholder="{extensions:Translate SearchWithThreeDot}"/>
            <ListView HasUnevenRows="True"
                      ItemsSource="{Binding Persons}"
                      SelectedItem="{Binding SelectedPerson, Mode=TwoWay}">
                <ListView.ItemTemplate>
                    <DataTemplate>
                        <TextCell Text="{Binding FullName}" Detail="{Binding EmailAddress}" />
                    </DataTemplate>
                </ListView.ItemTemplate>
            </ListView>
        </StackLayout>
    </ContentPage.Content>
...
</ContentPage>
Now open PeopleViewModel.cs and add the below code. In setter of FilterText property, we execute SearchWithDelayAsync() method. As we cannot run async method in property setter, we use AsyncRunner to make it sync. In SearchWithDelayAsync method, Task.Delay is used to wait for new key press. If user changes the filter text within the delay duration, then fetching will stop for new key press. We've specified the delay in PageDefaults.SearchDelayMilliseconds as 1 second. If no new keypress in 1 second, it'll start to search.
private string _filterText;

public string FilterText
{
    get => _filterText;
    set
    {
        _filterText = value;
        AsyncRunner.Run(SearchWithDelayAsync(_filterText));
    }
}

private async Task SearchWithDelayAsync(string filterText)
{
    if (!string.IsNullOrEmpty(filterText))
    {
        await Task.Delay(PageDefaults.SearchDelayMilliseconds);
        if (filterText != _filterText)
        {
            return;
        }
    }

    await FetchDataAsync(filterText);
}
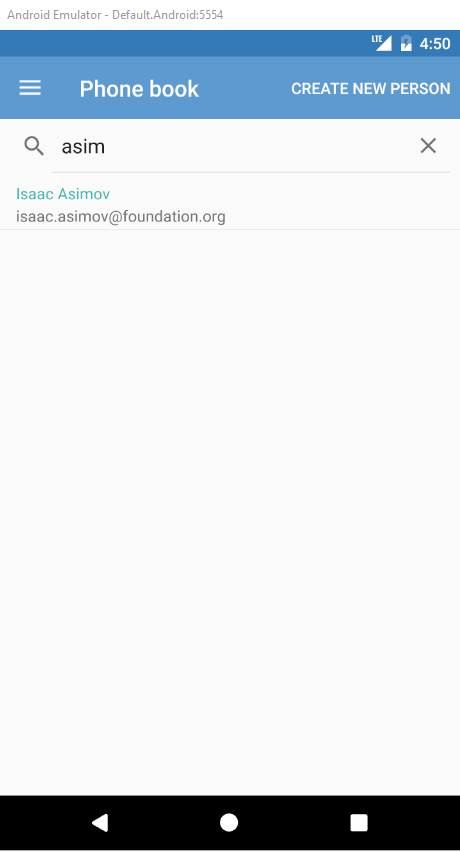
Final look of the filtered list view is like below:
Creating Person Details Page
Person details page will show personal information and phone numbers of
selected person. We will be editing personal information, adding and
removing phone numbers of the person. Also we'll use the same page for
creating new person and deleting existing person. To be able to navigate
to this page, user will tap on a person in the PeopleView.
We'll first create view, then view-model of the page. Let's start with
creating the PersonDetailsView.xaml.
Creating Person Details View
Basically, we'll do the same steps as we did for PeopleView page.
- Copy/paste _SampleView.xaml and rename the file as PersonDetailsView.xaml.
- Open PersonDetailsView.xaml and replace all _SampleView to PersonDetailsView.
- Delete the <Label> in PeopleDetails.xaml.
- Go to code behind (PersonDetailsView.xaml.cs) and rename all _SampleView to PersonDetailsView.
Now we have an empty view. Let's put controls inside the PersonDetailsView.xaml.
Creating Personal Information Section
The view will have 2 main sections. Personal information on the top and phone numbers on the bottom. Let's create personal information section!
Add highlighted rows to ContentPage tag.
- xmlns:extensions: To use Translate extension.
- xmlns:controls: To use CardView control.
- x:Name: To use as reference.
- Title: To show a page title. It'll dynamically change. For new person creation, we'll write "Create New Person", for existing person edit we'll write the name of person here.
<?xml version="1.0" encoding="utf-8" ?>
<ContentPage xmlns="http://xamarin.com/schemas/2014/forms"
             xmlns:x="http://schemas.microsoft.com/winfx/2009/xaml"
             xmlns:base="clr-namespace:Acme.PhoneBookDemo.ViewModels.Base;assembly=Acme.PhoneBookDemo.Mobile.Shared"
             x:Class="Acme.PhoneBookDemo.Views.PersonDetailsView"
             base:ViewManager.AutoWireViewModel="true"
             xmlns:extensions="clr-namespace:Acme.PhoneBookDemo.Extensions.MarkupExtensions;assembly=Acme.PhoneBookDemo.Mobile.Shared"
             xmlns:controls="clr-namespace:Acme.PhoneBookDemo.Controls;assembly=Acme.PhoneBookDemo.Mobile.Shared"
             x:Name="PersonDetailsPage"
             Title="{Binding Title}">
    <ContentPage.Content>
       ...
    </ContentPage.Content>
</ContentPage>
Then add the ListView as root item in <ContentPage.Content> as shown below:
<?xml version="1.0" encoding="utf-8" ?>
<ContentPage xmlns="http://xamarin.com/schemas/2014/forms"
             xmlns:x="http://schemas.microsoft.com/winfx/2009/xaml"
             xmlns:base="clr-namespace:Acme.PhoneBookDemo.ViewModels.Base;assembly=Acme.PhoneBookDemo.Mobile.Shared"
             x:Class="Acme.PhoneBookDemo.Views.PersonDetailsView"
             base:ViewManager.AutoWireViewModel="true"
             xmlns:extensions="clr-namespace:Acme.PhoneBookDemo.Extensions.MarkupExtensions;assembly=Acme.PhoneBookDemo.Mobile.Shared"
             xmlns:controls="clr-namespace:Acme.PhoneBookDemo.Controls;assembly=Acme.PhoneBookDemo.Mobile.Shared"
             x:Name="PersonDetailsPage"
             Title="{Binding Title}">
    <ContentPage.Content>
        <ListView HasUnevenRows="True">
            <ListView.Header>

                    <controls:CardView Margin="0,10" >
                        <StackLayout Padding="10" Spacing="0" >
                            <controls:LabelSection Text="{extensions:Translate PersonalInformations}"/>
                            <controls:Divider Margin="0,0,0,5"/>

                            <Label Text="{extensions:Translate Name}"></Label>
                            <Entry Text="{Binding Model.Name, Mode=TwoWay}"/>

                            <Label Text="{extensions:Translate Surname}"></Label>
                            <Entry Text="{Binding Model.Surname, Mode=TwoWay}"/>

                            <Label Text="{extensions:Translate EmailAddress}"></Label>
                            <Entry Text="{Binding Model.EmailAddress, Mode=TwoWay}" Margin="0,0,0,10"/>

                            <!-- SAVE BUTTON -->
                            <Button Margin="{StaticResource ActionButtonMargin}"
                                    Style="{StaticResource ActionButton}"
                                    Text="{extensions:Translate Save}"
                                    Command="{Binding SavePersonCommand}"/>

                        </StackLayout>
                    </controls:CardView>

            </ListView.Header>
        </ListView>
    </ContentPage.Content>
</ContentPage>
ListView works best when it's the root element (otherwise you may have scrolling issues). That's why we put ListView in the first place. ListView consists of 3 parts: Header, Items, Footer. We'll use header to show personal information and items to list phone numbers. Footer will not be used.
We set ListView HasUnevenRows="True". This is for automatically sizing list view rows.
In the ListView.Header tag, we place a CardView. This is a
custom control that draws a border to highlight section.
LabelSection is another custom control that shows label
as a title.
Divider is a custom control as well that draws a horizontal line.
In CardView, add a <StackLayout> to show elements vertically. Put labels, entries for Name, Surname and EmailAddress fields. All the entries are TwoWay binding, because we propagate value in both directions.
ListView control seems to be an easy but complicated control. We recommend to use ListView in these circumstances:
- Try to use ListView as root item of the Page.
- Do not use nested ListViews (ListView in ListView).
- Use TextCell and SwitchCell wherever you can.
- Avoid placing a ListView inside a ScrollView.
Creating PersonDetailsViewModel
The view-model name for PersonDetailsView must be PersonDetailsViewModel. Copy _SampleViewModel.cs in ViewModels folder and paste into the same folder. Then rename the new file as PersonDetailsViewModel.cs. Open the file and rename _SampleViewModel class name to PersonDetailsViewModel. Now we have an empty view-model. Do the following steps in PersonDetailsViewModel class:
Inject IPersonAppService to the constructor. This is for data transfer with server.
private readonly IPersonAppService _personAppService;

public PersonDetailsViewModel(IPersonAppService personAppService)
{
    _personAppService = personAppService;
}
To save user, create an async method called SavePersonAsync(). This method will update existing person or create new person and it'll be used in the command of save button.
private async Task SavePersonAsync()
{
    if (IsExistingPerson)
    {
        await UpdateExistingPersonAsync();
    }
    else
    {
        await CreateNewPersonAsync();
    }

    await NavigationService.GoBackAsync();
}

private async Task UpdateExistingPersonAsync()
{
    var editPersonInput = new EditPersonInput
    {
        EmailAddress = Model.EmailAddress,
        Name = Model.Name,
        Surname = Model.Surname,
        Id = Model.Id
    };

    await _personAppService.EditPerson(editPersonInput);
}

private async Task CreateNewPersonAsync()
{
    var createPersonInput = new CreatePersonInput
    {
        EmailAddress = Model.EmailAddress,
        Name = Model.Name,
        Surname = Model.Surname,
    };

    await _personAppService.CreatePerson(createPersonInput);
}
Create a command for save button.
public ICommand SavePersonCommand => AsyncCommand.Create(SavePersonAsync);Another important property is the model. Create a public property with name Model. RaisePropertyChanged event helps to notify view that model is changed.
private PersonListModel _model;
public PersonListModel Model
{
    get => _model;
    set
    {
        _model = value;
        RaisePropertyChanged(() => Model);
    }
}
To retrieve the selected person from PeopleView, we'll use the InitializeAsync(object navigationData) method. This method is located in the base class of view-model and is being executed by navigation service. You need to cast navigationData to your specified type. We'll use the same view-model for new person creation. So if navigationData is null, it means it's a new person. Create a private bool property called IsExistingPerson for new person or existing person discrimination. And add IsAddPhoneButtonEnabled to disable AddPhoneNumber button if input is not valid.
private bool _isExistingPerson;
public bool IsExistingPerson
{
    get => _isExistingPerson;
    set
    {
        _isExistingPerson = value;
        RaisePropertyChanged(() => IsExistingPerson);
    }
}

private bool _isAddPhoneButtonEnabled;
public bool IsAddPhoneButtonEnabled
{
    get => _isAddPhoneButtonEnabled;
    set
    {
        _isAddPhoneButtonEnabled = value;
        RaisePropertyChanged(() => IsAddPhoneButtonEnabled);
    }
}

public override async Task InitializeAsync(object navigationData)
{
    IsExistingPerson = navigationData != null;
    IsAddPhoneButtonEnabled = false;

    if (IsExistingPerson)
    {
        Model = (PersonListModel)navigationData;
    }
    else
    {
        Model = new PersonListModel();
    }
}
Up to here, we listed people and update one of them by tapping on the person item. Now let's implement new user creation functionality. We've already covered create person in PersonDetailsViewModel. We'll just need to navigate to PersonDetailsView with an empty navigationData. The rest will work fine.
Add Person Creation Functionality
Creating new person needs permission. Open PermissionKey class and add the below line for shortcut. We'll use it to hide/show Create Person button.
public const string PhoneBookCreatePerson = "Pages.Tenant.PhoneBook.CreatePerson";Open PeopleView.xaml and add the lines to the ContentPage tag. The x:Name gives a name to the page. It'll be needed for being referenced in toolbar item. And we import permission namespace to use PermissionKey class.
<ContentPage ...
    x:Name="PeoplePage"
    xmlns:permission="clr-namespace:Acme.PhoneBookDemo.Services.Permission;assembly=Acme.PhoneBookDemo.Mobile.Shared"
    xmlns:controls="clr-namespace:Acme.PhoneBookDemo.Controls;assembly=Acme.PhoneBookDemo.Mobile.Shared"
...>
Adding a toolbar item is easy! Insert toolbar item into ContentPage.ToolbarItems as a child. We used a special toolbar item, which is derived from ToolbarItem. This extended toolbar item can be visible/hidden by binding property. The default ToolbarItem has no such feature. In the IsVisible property, we used HasPermission extension. This extension is located in Extensions\MarkupExtensions. It returns true/false according to the Text property. And as a Text property, we pass PermissionKey.PhoneBookCreatePerson. The command property is being executed when button is tapped. We binded CreateNewPersonCommand. In the next step, this command will be added to the view-model.
<ContentPage.ToolbarItems>
    <controls:HideableToolbarItem
        Text="{extensions:Translate CreateNewPerson}"
        Command="{Binding CreateNewPersonCommand}"
        IsVisible="{extensions:HasPermission Text={x:Static permission:PermissionKey.PhoneBookCreatePerson}}"
        ParentPage="{x:Reference PeoplePage}" />
</ContentPage.ToolbarItems>
Now open PeopleViewModel.cs and add the below code. We navigate to PersonDetailsView with null parameter, because we handle the null case as new person creation.
public ICommand CreateNewPersonCommand => HttpRequestCommand.Create(CreateNewPersonAsync);
public async Task CreateNewPersonAsync()
{
    await GotoPersonDetailsAsync(null);
}

public PersonListModel SelectedPerson
        {
            get => _selectedPerson;
            set
            {
                _selectedPerson = value;
                RaisePropertyChanged(() => SelectedPerson);
                AsyncRunner.Run(GotoPersonDetailsAsync(_selectedPerson));
            }
        }

private async Task GotoPersonDetailsAsync(PersonListModel person)
{
    await NavigationService.SetDetailPageAsync(typeof(PersonDetailsView), person, pushToStack: true);
}
Input Validation
We've implemented create and update person functions, but we didn't validate input. Validating an object before sending to server is very easy. Open PersonDetailsViewModel.cs and add Validate() method.
private static bool Validate(object input)
{
    var validationResult = DataAnnotationsValidator.Validate(input);
    if (validationResult.IsValid)
    {
        return true;
    }

    UserDialogHelper.Warn(validationResult.ConsolidatedMessage);
    return false;
}
Then use Validate() method in UpdateExistingPersonAsync() and in CreateNewPersonAsync() methods like below:
private async Task UpdateExistingPersonAsync()
{
    var editPersonInput = new EditPersonInput
    {
        EmailAddress = Model.EmailAddress,
        Name = Model.Name,
        Surname = Model.Surname,
        Id = Model.Id
    };

    if (!Validate(editPersonInput))
    {
        return;
    }

    await _personAppService.EditPerson(editPersonInput);
}

private async Task CreateNewPersonAsync()
{
    var createPersonInput = new CreatePersonInput
    {
        EmailAddress = Model.EmailAddress,
        Name = Model.Name,
        Surname = Model.Surname,
    };

    if (!Validate(createPersonInput))
    {
        return;
    }

    await _personAppService.CreatePerson(createPersonInput);
}
To test it, run the app and try to create a person with an invalid email address.
Deleting Person
Add the delete permission key in PermissionKey.cs.
public const string PhoneBookDeletePerson = "Pages.Tenant.PhoneBook.DeletePerson";We'll place a delete button inside the person details view. So open the PersonDetailsView.xaml and add the button as highlighted below.
In the next step, we'll add DeletePersonCommand in view-model, as it's used as button's command. And visibility of button is being binded to IsDeleteButtonVisible property. The reason is we'll hide the button if user has no delete permission or it's a new user creation page.
<ContentPage.Content>
    <ListView HasUnevenRows="True"
              ItemsSource="{Binding Model.Phones}" Margin="10">

        <ListView.Header>
            <StackLayout>

                <controls:CardView Margin="0,10" >
                    <StackLayout Padding="10" Spacing="0" >
                        <controls:LabelSection Text="{extensions:Translate PersonalInformations}"/>
                        <controls:Divider Margin="0,0,0,5"/>

                        <Label Text="{extensions:Translate Name}"></Label>
                        <Entry Text="{Binding Model.Name, Mode=TwoWay}"/>

                        <Label Text="{extensions:Translate Surname}"></Label>
                        <Entry Text="{Binding Model.Surname, Mode=TwoWay}"/>

                        <Label Text="{extensions:Translate EmailAddress}"></Label>
                        <Entry Text="{Binding Model.EmailAddress, Mode=TwoWay}" Margin="0,0,0,10"/>

                        <!-- SAVE BUTTON -->
                        <Button Margin="{StaticResource ActionButtonMargin}"
                                    Style="{StaticResource ActionButton}"
                                    Text="{extensions:Translate Save}"
                                    Command="{Binding SavePersonCommand}"/>

                        <!-- DELETE BUTTON -->
                        <Button Margin="{StaticResource ActionButtonMargin}"
                                    IsVisible="{Binding IsDeleteButtonVisible}"
                                    Style="{StaticResource DangerButton}"
                                    Text="{extensions:Translate Delete}"
                                    Command="{Binding DeletePersonCommand}"/>
                    </StackLayout>
                </controls:CardView>
        ...
Open PersonDetailsViewModel.cs and add the highlighted codes.
We inject IPermissionService to check whether user has delete permission. The delete button will be visible if user has permission. The delete button is binded to IsDeleteButtonVisible property. We create the DeletePersonCommand. In this command, we ask user for a confirmation with UserDialogs.Instance.ConfirmAsync(...). If user accepts, we make request to server with _personAppService.DeletePerson(...), then we leave the screen with NavigationService.GoBackAsync() method.
using System.Threading.Tasks;
using System.Windows.Input;
using Abp.Application.Services.Dto;
using Acme.PhoneBookDemo.Core.Threading;
using Acme.PhoneBookDemo.PhoneBook;
using Acme.PhoneBookDemo.PhoneBook.Dto;
using Acme.PhoneBookDemo.Services.Permission;
using Acme.PhoneBookDemo.UI;
using Acme.PhoneBookDemo.Validations;
using Acme.PhoneBookDemo.ViewModels.Base;

namespace Acme.PhoneBookDemo.ViewModels
{
    public class PersonDetailsViewModel : XamarinViewModel
    {
        private readonly IPersonAppService _personAppService;
        private readonly IPermissionService _permissionService;
        private bool _isNewPerson;
        private bool _isDeleteButtonVisible;

        public ICommand SavePersonCommand => AsyncCommand.Create(SavePersonAsync);
        public ICommand DeletePersonCommand => AsyncCommand.Create(DeletePersonAsync);

        public bool IsDeleteButtonVisible
        {
            get => _isDeleteButtonVisible;
            set
            {
                _isDeleteButtonVisible = value;
                RaisePropertyChanged(() => IsDeleteButtonVisible);
            }
        }

        private async Task DeletePersonAsync()
        {
            var accepted = await UserDialogs.Instance.ConfirmAsync(L.Localize("UserDeleteWarningMessage", Model.FullName),
                L.Localize("AreYouSure"), L.Localize("YesDelete"), L.Localize("Cancel"));

            if (!accepted)
            {
                return;
            }

            await SetBusyAsync(async () =>
            {
                await _personAppService.DeletePerson(new EntityDto(Model.Id));
                await NavigationService.GoBackAsync();
            });
        }

        ...
        public PersonDetailsViewModel(IPersonAppService personAppService, IPermissionService permissionService)
        {
            _personAppService = personAppService;
            _permissionService = permissionService;
        }

        public override async Task InitializeAsync(object navigationData)
        {
            IsExistingPerson = navigationData != null;
            IsAddPhoneButtonEnabled = false;

            if (IsExistingPerson)
            {
                Model = (PersonListModel)navigationData;
                IsDeleteButtonVisible = _permissionService.HasPermission(PermissionKey.PhoneBookDeletePerson);
            }
            else
            {
                Model = new PersonListModel();
                IsDeleteButtonVisible = false;
            }
        }
    }
}
Listing Phone Numbers
To list phone numbers, we add following lines to PersonDetailsView.xaml:
<ListView HasUnevenRows="True" ItemsSource="{Binding Model.Phones}" Margin="10">
    ...
    <ListView.ItemTemplate>
        <DataTemplate>
            <ViewCell>
                <StackLayout Orientation="Horizontal" BackgroundColor="White" Padding="10,0,10,0" >
                    <Label Text="{Binding Type}" VerticalOptions="Center" FontAttributes="Bold"/>
                    <Label Text="{Binding Number}" Style="{StaticResource ActiveLabel}" VerticalOptions="Center"/>
                </StackLayout>
            </ViewCell>
        </DataTemplate>
    </ListView.ItemTemplate>
Deleting Phone Number
To delete a phone number, we put Iconize button. This control uses Font Awesome to create a button with icon. The only disadvantage of the control is: you cannot use text and icon at the same time! For more information about iconize library, you can check out https://github.com/jsmarcus/Xamarin.Plugins/tree/master/Iconize/.
Add the below namespace to the ContentPage tag in PersonDetailsView.xaml:
xmlns:iconize="clr-namespace:FormsPlugin.Iconize;assembly=FormsPlugin.Iconize"
Add delete button after phone number label. See the highlighted section below:
<ListView.ItemTemplate>
    <DataTemplate>
        <ViewCell>
            <StackLayout Orientation="Horizontal" BackgroundColor="White" Padding="10,0,10,0" >
                <Label Text="{Binding Type}" VerticalOptions="Center" FontAttributes="Bold"/>
                <Label Text="{Binding Number}" Style="{StaticResource ActiveLabel}" VerticalOptions="Center"/>
                <iconize:IconButton Margin="3"
                            Command="{Binding Source={x:Reference PersonDetailsPage}, Path=BindingContext.DeletePhoneNumberCommand}"
                            CommandParameter="{Binding .}"
                            Text="fa-trash"
                            TextColor="White"
                            BackgroundColor="Red"
                            HeightRequest="{StaticResource SmallActionButtonSize}"
                            WidthRequest="{StaticResource SmallActionButtonSize}"
                            VerticalOptions="CenterAndExpand"
                            HorizontalOptions="EndAndExpand">
                </iconize:IconButton>
            </StackLayout>
        </ViewCell>
    </DataTemplate>
</ListView.ItemTemplate>
The text of button is fa-trash. This is a Font Awesome text. You can find other Font Awesome icons here: http://fontawesome.io/icons/
The command property of IconButton is a bit different than usual binding. The reason is DeletePhoneNumberCommand is not in PhoneInPersonListDto. But it's a root property located in view-model. That's why we set Source of command to PersonDetailsPage and Path to BindingContext.DeletePhoneNumberCommand. Setting CommandParameter to "." refers to PhoneInPersonListDto. So we'll be sending PhoneInPersonListDto as parameter to DeletePhoneNumberCommand in the view-model.
Let's create DeletePhoneNumberCommand in the view-model. Open PersonDetailsViewModel.cs and add these methods and property.
public ICommand DeletePhoneNumberCommand => new Command<PhoneInPersonListDto>(async phone => await DeletePhoneNumberAsync(phone));

private async Task DeletePhoneNumberAsync(PhoneInPersonListDto phone)
{
    await SetBusyAsync(async () =>
    {
        await _personAppService.DeletePhone(new EntityDto<long>(phone.Id));
        Model.Phones.Remove(phone);
    });
}
The delete button will look like below:
Adding Phone Numbers
To add new phone numbers, add a new CardView to PersonDetailsView.xaml.
<ContentPage xmlns="http://xamarin.com/schemas/2014/forms"
             xmlns:x="http://schemas.microsoft.com/winfx/2009/xaml"
             xmlns:base="clr-namespace:Acme.PhoneBookDemo.ViewModels.Base;assembly=Acme.PhoneBookDemo.Mobile.Shared"
             x:Class="Acme.PhoneBookDemo.Views.PersonDetailsView"
             base:ViewManager.AutoWireViewModel="true"
             xmlns:extensions="clr-namespace:Acme.PhoneBookDemo.Extensions.MarkupExtensions;assembly=Acme.PhoneBookDemo.Mobile.Shared"
             xmlns:controls="clr-namespace:Acme.PhoneBookDemo.Controls;assembly=Acme.PhoneBookDemo.Mobile.Shared"
             xmlns:iconize="clr-namespace:FormsPlugin.Iconize;assembly=FormsPlugin.Iconize"
             x:Name="PersonDetailsPage"
             Title="{Binding Title}">
    <ContentPage.Content>
        <ListView HasUnevenRows="True"
                  ItemsSource="{Binding Model.Phones}" Margin="10">

            <ListView.Header>
                <StackLayout>

                    <controls:CardView Margin="0,10" >
                        <StackLayout Padding="10" Spacing="0" >
                            <controls:LabelSection Text="{extensions:Translate PersonalInformations}"/>
                            <controls:Divider Margin="0,0,0,5"/>

                            <Label Text="{extensions:Translate Name}"></Label>
                            <Entry Text="{Binding Model.Name, Mode=TwoWay}"/>

                            <Label Text="{extensions:Translate Surname}"></Label>
                            <Entry Text="{Binding Model.Surname, Mode=TwoWay}"/>

                            <Label Text="{extensions:Translate EmailAddress}"></Label>
                            <Entry Text="{Binding Model.EmailAddress, Mode=TwoWay}" Margin="0,0,0,10"/>

                            <!-- SAVE BUTTON -->
                            <Button Margin="{StaticResource ActionButtonMargin}"
                                    Style="{StaticResource ActionButton}"
                                    Text="{extensions:Translate Save}"
                                    Command="{Binding SavePersonCommand}"/>

                            <!-- DELETE BUTTON -->
                            <Button Margin="{StaticResource ActionButtonMargin}"
                                    IsVisible="{Binding IsDeleteButtonVisible}"
                                    Style="{StaticResource DangerButton}"
                                    Text="{extensions:Translate Delete}"
                                    Command="{Binding DeletePersonCommand}"/>
                        </StackLayout>
                    </controls:CardView>

                    <controls:CardView Margin="0" IsVisible="{Binding IsExistingPerson}" >
                        <StackLayout Padding="10" Spacing="0">

                            <controls:LabelSection Text="{extensions:Translate PhoneNumber}"/>
                            <controls:Divider Margin="0,0,0,5"/>

                            <Grid>
                                <Grid.ColumnDefinitions>
                                    <ColumnDefinition Width="0.3*"/>
                                    <ColumnDefinition Width="0.7*"/>
                                </Grid.ColumnDefinitions>

                                <Picker Title="{extensions:Translate Type}"
                                        ItemsSource="{Binding PhoneTypes}"
                                        HorizontalOptions="FillAndExpand"
                                        SelectedItem="{Binding SelectedPhoneType}"/>
                                <Entry Text="{Binding NewPhoneNumber, Mode=TwoWay}"
                                       Grid.Column="1"
                                       Placeholder="{extensions:Translate PhoneNumber}"/>
                            </Grid>

                            <!-- ADD PHONE BUTTON -->
                            <Button Margin="{StaticResource ActionButtonMargin}"
                                    Style="{StaticResource ActionButton}"
                                    Text="{extensions:Translate Add}"
                                    Command="{Binding AddPhoneNumberCommand}"
                                    CommandParameter="{Binding Model.Id}"
                                    IsEnabled="{Binding IsAddPhoneButtonEnabled}"/>

                        </StackLayout>
                    </controls:CardView>

                </StackLayout>
            </ListView.Header>
And we will add the view-model codes to the PersonDetailsViewModel.cs:
public List<string> PhoneTypes { get; } = Enum.GetNames(typeof(PhoneType)).ToList();
public ICommand AddPhoneNumberCommand => new Command<int>(async personId => await AddPhoneNumberAsync(personId) , _ => IsAddPhoneButtonEnabled);

private string _newPhoneNumber;
private string _selectedPhoneType = PhoneType.Mobile.ToString();

public string SelectedPhoneType
{
    get => _selectedPhoneType;
    set
    {
        _selectedPhoneType = value;
        RaisePropertyChanged(() => SelectedPhoneType);
    }
}

public string NewPhoneNumber
{
    get => _newPhoneNumber;
    set
    {
        _newPhoneNumber = value;
        RaisePropertyChanged(() => NewPhoneNumber);
        IsAddPhoneButtonEnabled = !string.IsNullOrWhiteSpace(_newPhoneNumber);
    }
}

private async Task AddPhoneNumberAsync(int personId)
{
    var input = new AddPhoneInput
    {
        Number = NewPhoneNumber,
        PersonId = personId,
        Type = (PhoneType)Enum.Parse(typeof(PhoneType), SelectedPhoneType)
    };

    if (!Validate(input))
    {
        return;
    }

    await SetBusyAsync(async () =>
    {
        var phone = await _personAppService.AddPhone(input);
        Model.Phones.Add(phone);
        NewPhoneNumber = "";
        RaisePropertyChanged(() => Model.Phones);
    });
}
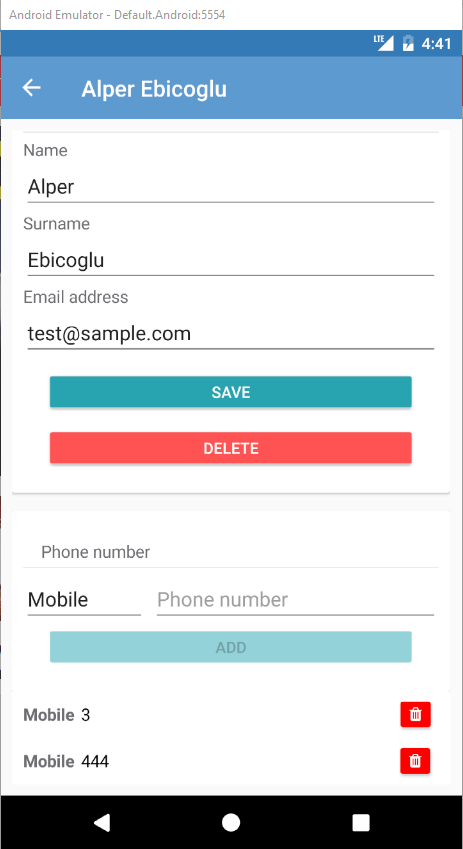
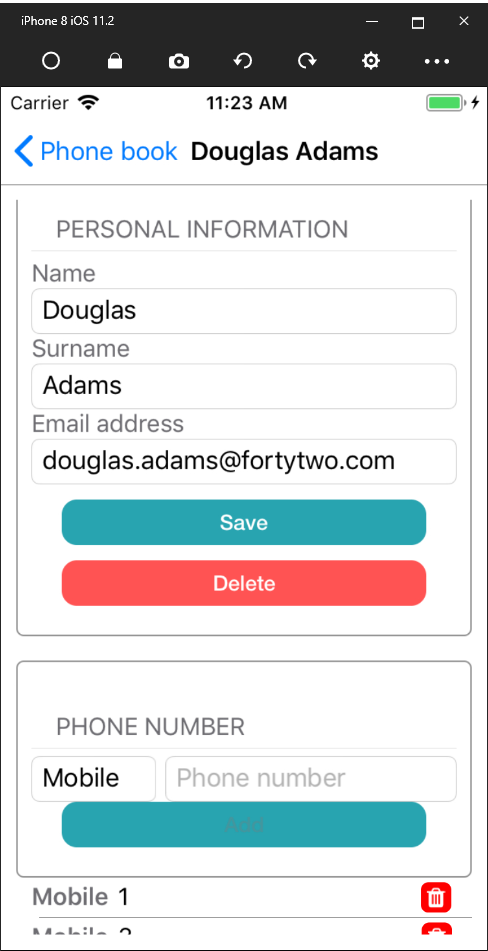
Final look on iOS platform:
Conclusion
In this document, we built a complete example that covers most parts of the ASP.NET Zero Xamarin development. We intentionally used different approaches for similar tasks to show you different styles of development. ASP.NET Zero provides an architecture, but does not restrict you. You can decide on your own style of development.
Source Code
You should purchase ASP.NET Zero in order to get source
code. After purchasing, you can get the sample project from the private
GitHub repository: https://github.com/aspnetzero/aspnet-zero-samples/tree/master/PhoneBook-Core