Xamarin Development Guide
Introduction
Xamarin is a cross-platform UI toolkit that allows developers to
efficiently create native cross platform user interface layouts.
This document is intended to show how to setup a Xamarin development
environment and introduce existing features and user interfaces on
ASP.NET Zero Xamarin platform. For an overview of the Xamarin
installation and setup practices see Xamarin.Forms
Requirements
and
Installation.
For an overview of the ASP.NET Zero getting started see ASP.NET Zero
Getting Started. The ASP.NET Zero Xamarin is only
available for ASP.NET Core included Angular UI and Mvc UI.
Prerequisites
Following tools are needed in order to develop ASP.NET Zero Xamarin:
- Visual Studio 2017 v15.4.4+
- Mac for iOS simulator
ASP.NET Zero Xamarin applications can be written for the following operating systems:
- iOS 8 or higher
- Android 4.0.3 (API 15) or higher (more details)
Android
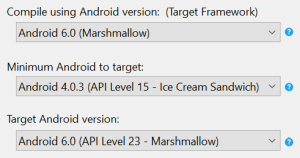
You should have the latest Android SDK Tools and Android API platform installed. You can update to the latest versions using the Android SDK Manager.
Additionally, the target/compile version for Android projects must be set to Use latest installed platform. However the minimum version can be set to API 15 so you can continue to support devices that use Android 4.0.3 and newer.
These values are set in the Project Options:
Project Options > Application > Application Properties
Mac System Requirements
You can use Visual Studio for Mac to develop Xamarin.Forms apps on OS X El Capitan (10.11) or newer. To develop iOS apps, it is recommended having at least the iOS 10 SDK and Xcode latest installed.
Windows System Requirements
Xamarin.Forms apps for iOS and Android can be built on any Windows installation that supports Xamarin development. A networked Mac is required for iOS development.
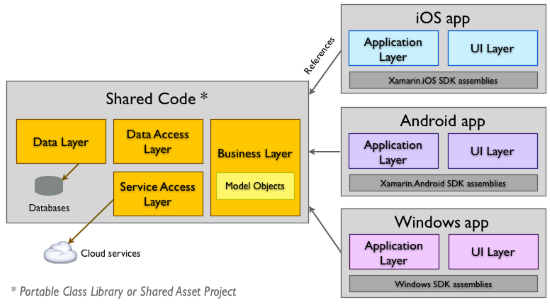
Solution Structure (Layers)
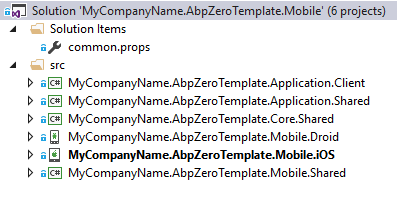
After you download your project, you will see 3 types of solutions;
- .Mobile Xamarin and related projects included.
- .Web Web and related projects included.
- .All All the projects included.
For Xamarin development, you can open .Mobile.sln.
Xamarin Architecture
Mobile Solution
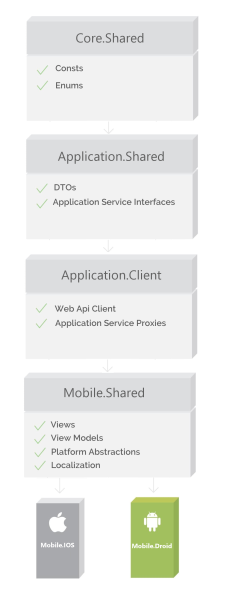
There are 6 projects in the mobile solution:
- Core.Shared project contains basic primitive types like consts, enums that used in all layers of the solution.
- Application.Shared project contains data transfer objects (DTOs) and interfaces of application services shared with application layer of the backend.
- Application.Client project contains Web Api client (bridge between mobile app and host) and proxy classes of Application Services.
- Mobile.Shared project houses the code shared by iOS and Android platforms, views, view models, localization and platform abstractions.
- Mobile.iOS project contains iOS specific classes.
- Mobile.Droid project contains Android specific classes.
Debugging
Host
To start debugging Xamarin app you need to configure host settings. You
can use Web.Host to feed the Xamarin app.
Open Windows Command Prompt. Go to the folder where your Web.Host csproj file is located.
Then run the command below to start hosting your Web API:
dotnet run --launch-profile Mobile
This will start the Web.Host project from the address "https://0.0.0.0:44301" which enables to access it from external networks.
Alternatively, there's start-host-mobile.bat file in your Web.Host directory which does the same for Windows users.
Warning
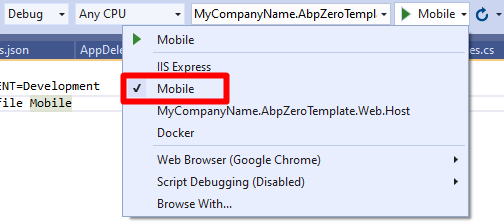
If you want to start Web.Host from Visual Studio, set Web.Host as startup project and choose the Mobile profile.
Create a development certificate
Installing the .NET Core SDK installs the ASP.NET Core HTTPS development certificate to the local user certificate store. However, while the certificate has been installed, it's not trusted. To trust the certificate, perform the following one-time step to run the dotnet dev-certs tool:
dotnet dev-certs https --trust
This will allow to trust the self-signed ASP.NET Core HTTPS development certificate in your computer.
For more information, see Connect to Local Web Services from iOS Simulators and Android Emulators
We have successfully started host. Now we can configure Xamarin app to connect this host.
Prepare for production
When you release your Xamarin app for production you need to change DefaultHostUrl in ApiUrlConfig class!
ApiUrlConfig.DefaultHostUrl = "https://mywebapi.com/"
Important Be aware that connecting over Wi-Fi needs both the device and the computer to be on the same Wi-Fi network! To avoid confusions to you can completely turn off your mobile data connection.

Debugging Android
There are a few installation steps and configuration details required to install Xamarin.Android. It's highly recommended you to read the Xamarin Android Setup and Deployment document
for necessary setups.
If you are using the default Android Emulator, you don't need to change anything. The default loopback address for the Android emulator is
10.0.2.2and it's written in theStartApplication()method ofSplashActivity.csDebugServerIpAddresses.Current = "10.0.2.2";If you are using Genymotion Emulator, change it as below:
DebugServerIpAddresses.Current = "10.0.3.2"If you are using a real Android device, change it as your computer's local IP and make sure your Android device and your computer is connecting from the same network (your local Wi-Fi). To connect your real mobile device, make sure your computer's firewall is off (or create an exception in your firewall to allow the port
44301)DebugServerIpAddresses.Current = "XXX.XXX.XXX.XXX"
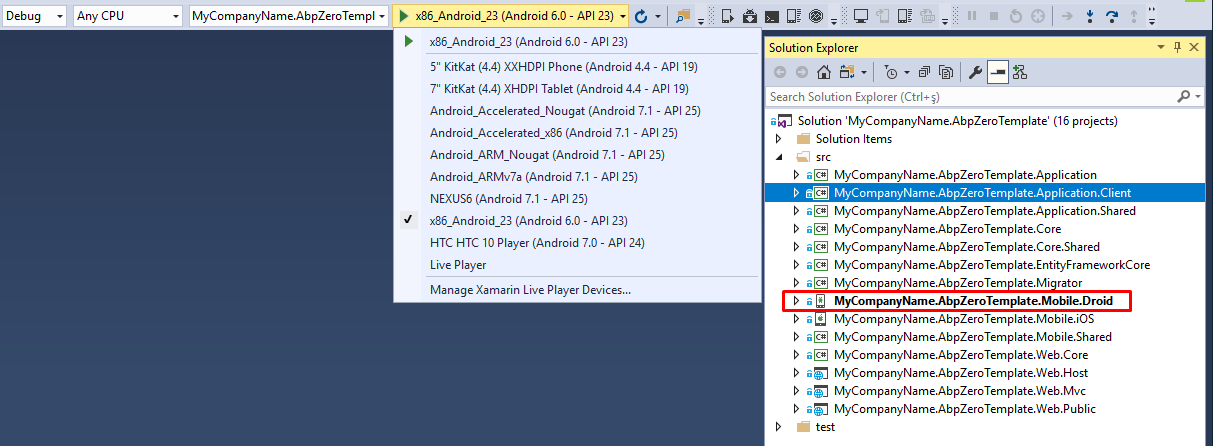
After successful setup, set Mobile.Droid as startup project. Choose an Android emulator from list and press start button.
Debugging iOS
There are a few requirements that must be adhered to when developing for iOS in Visual Studio. A Mac is required to compile IPA files. Applications cannot be deployed to a device without Apple's certificates and code-signing tools. Also, the iOS simulator can be used only on a Mac.
The IP address for the Web.Host backend service is written in the FinishedLaunching() method of AppDelegate.cs. You need to set this address as your local IP. Eg: 192.168.1.120
DebugServerIpAddresses.Current = "XXX.XXX.XXX.XXX";
Information
There are a number of configuration options available to debug iOS app. It's highly recommended you to read the Xamarin iOS Getting started document to build an iOS application and debug using a networked Mac to host Apple's compiler and simulator.
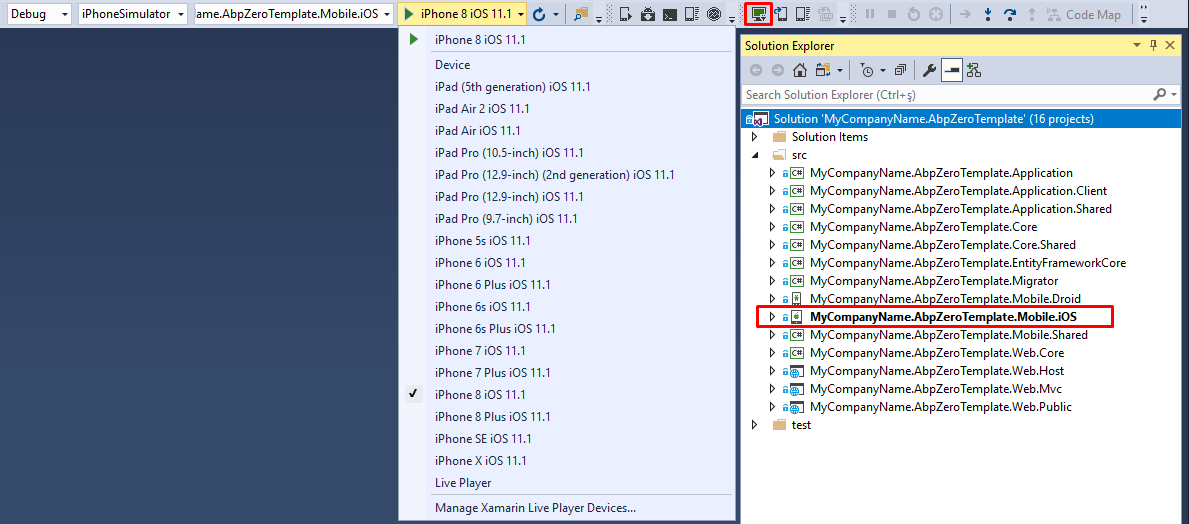
After you successfully configure and connect to a Mac, choose an iPhone simulator from list and press start button.
You can also, see the following docs from Microsoft:
Known Problems
- Long project name causes IOS app to not run on Windows machines while connecting to an IPhone or IPad. So, if you face such a problem, you can move your project to a directory with a shorter name.
Xamarin.Forms
A key component of building cross-platform applications is being able to share code across various platform-specific projects. ASP.NET Zero Xamarin is using Xamarin.Forms to maximize code sharing between two end platforms (iOS & Android). It is expected to write shared codes in Mobile.Shared project so that it will be used in both iOS and Android. If you need platform specific development then try to use class abstractions in shared project and implement/extend in end platforms.
Mobile.Droid
Xamarin Android project has a very basic structure. ASP.NET Zero adds or modifies these files in the default project;
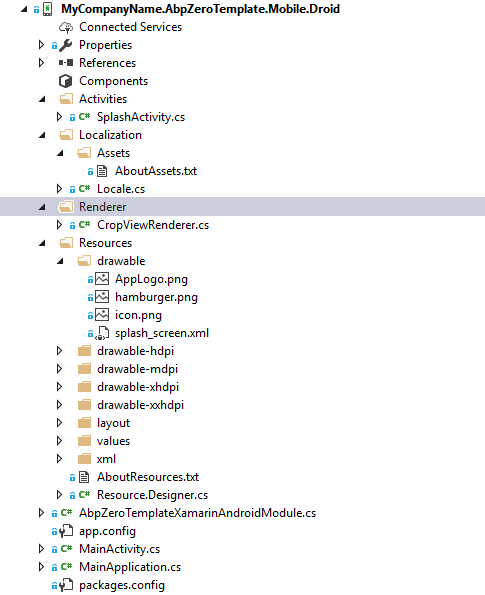
Android Project Structure
- SplashActivity There are time consuming background operations
while starting up the app. Android does not have a default way to
show a splash screen on startup. SplashActivity class is the main
launcher. It initializes Abp module (in
AbpZeroTemplateXamarinAndroidModule class).
As this app requires internet connection, first thing is checking whether device can connect to internet or not. If there's no internet connection, a confirmation dialog appears on the device to ask user for enabling internet. Finally SplashActivity directly routes to MainActivity. - MainActivity This is the main startup Activity for the application. In this activity, platform specific initializations are done. Unobserved and Unhandled exceptions handlers are registered here with ExceptionHandler class. Finally MainActivity routes to App class which is in the shared project.
- CropViewRenderer This is a platform specific renderer to crop images for Android. It is used in profile picture change screen.
- Resources/drawable This directory stores images for Android. AppLogo.png is the logo while showing the splash screen in Android. So you should change AppLogo with your own logo file based on the same sizes. AppLogo.png is also located in drawable-mdpi folder with different size. Icon.png is a launcher icon shown in application drawer of the Android. It is located in drawable, drawable-hdpi, drawable-xhdpi, drawable-xxhdpi with different sizes. You should change these icons with your own application icon files. There is splash_screen.xml which is used for defining a style called "MyTheme.Splash" in values/styles.xml.
- AbpZeroTemplateXamarinAndroidModule This is the Abp module. It depends on AbpZeroTemplateXamarinSharedModule.
- Locale This class is an adapter between .Net cultures and Android cultures.
Information
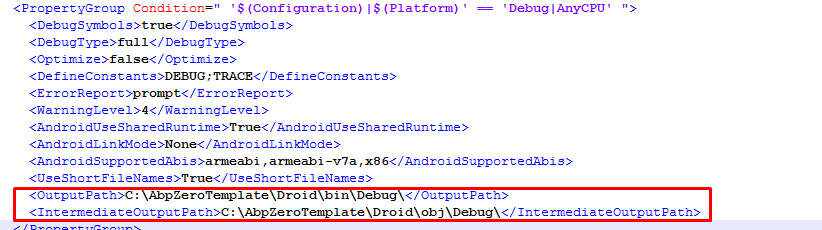
ASP.NET Zero Xamarin changed the output path (bin) and intermediate output path (obj) of Android project to be shorter. The main reason of this is avoiding "Path too long exception" while compiling project. If you want to modify it, you can open Mobile.iOS.csproj in notepad and find replace all occurrences of OutputPath and IntermediateOutputPath tags.
Mobile.iOS
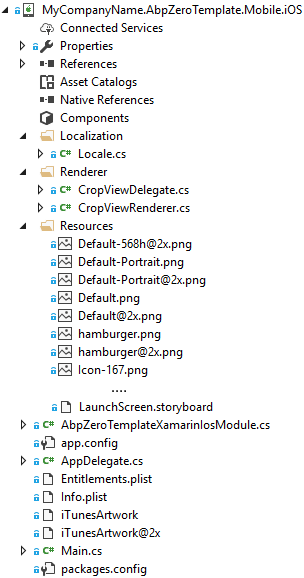
iOS Structure
Xamarin iOS project has a very simple structure. ASP.NET Zero adds or modifies these files in the default project;
- Locale This class is an adapter between .Net cultures and iOS cultures.
- CropViewRenderer, CropViewDelegate These files are renderer for CropView in iOS.
- AbpZeroTemplateXamariniOSModule This is the Abp module. It depends on AbpZeroTemplateXamarinSharedModule.
- AppDelegate This is the main startup class for iOS like MainActivity in Android. All the iOS specific library initializations are done in this class. Unobserved and Unhandled exceptions handlers are registered here with ExceptionHandler class.
- Resources In this folder basically 2 types of files are located; Application icon and splash screen images. You should change all the Icon*.png and Default*.png files files with yours based on the same sizes.
Mobile.Shared
Shared project is a special type of project that can be used across disparate CLI platforms including Mobile.iOS and Mobile.Android. That's why it's not been targeted to a specific framework version but targeted Netstandard 2.0. Shared code project should only reference assemblies that are available across all platforms. Shared project should implement as much non-UI functionality as is possible.
Setting Up A Xamarin Cross Platform Solution
Project structure
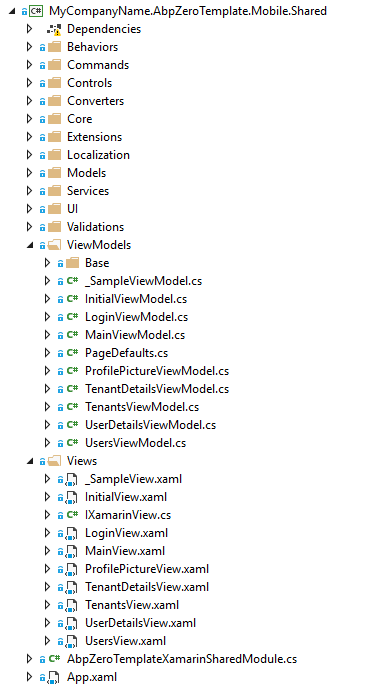
Shared Project Structure
Mobile.Shared project consists of fundamentals of a Xamarin application like Behaviors, Commands, Controls, Converters, Extensions, Views and ViewModels.
MVVM
The Model-View-ViewModel (MVVM) architectural pattern is used in the shared project. The pattern enforces a separation between three software layers the XAML user interface, stored in Views folder; the underlying data are stored in Models folder; and an intermediary between the View and the Model, are stored in ViewModels folder. The View and the ViewModel are often connected through data bindings defined in the XAML file. The BindingContext for the View is always an instance of the ViewModel.
ASP.NET Zero has a built-in feature that binds View with ViewModel. BindingContext for a view is automatically set when AutoWireViewModel flag set to true in xaml. There's a naming convention between ViewModels and Views. A xaml filename must end with View postfix and the binding context of the xaml filename must end with ViewModel postfix. For example if xaml filename is ProductView.xaml the corresponding view model filename must be ProductViewModel.cs.
<ContentPage
   ...
   base:ViewManager.AutoWireViewModel="true"
   ...>
There's an empty sample view called _SampleView.xaml and binding context _SampleViewModel.cs. You can copy paste and rename these empty templates to add a new blank page.
Dependency Injection
ASP.NET Zero Xamarin uses ASP.NET Boilerplate Framework's dependency injection system. Therefore it uses Castle Windsor as an Inversion of Control container. To resolve dependencies; you can use constructor or property injection, beside there's a shortcut class called DependencyResolver, which can be used to resolve dependencies as well. ASP.NET Boilerplate provides ITransientDependency and ISingletonDependency interfaces as a shortcut to register classes. See ASP.NET Boilerplate Dependency Injection
Communicating with Host Api
AbpApiClient class is used to communicate with host. In this class, FlurlClient is used as http client. The host address DefaultHostUrl is stored in ApiUrlConfig class. Before publishing application you need to change this address with your production host server address. In development time, it's important to change LocalhostIp as your computer's LAN IP in DebugServerIpAdresses.cs.
WebRequestExecuter class handles http web requests in a safe manner. When the request fails, it handles different types of exceptions. So if it's a timeout exception, it asks user to retry the same request. Or if it's a user friendly exception thrown by ABP it shows an alert and so on... You have to write a success and a fail callback to handle the result. In fail callback, the exception can be retrieved and in success callback result of the request can be retrieved.
SetBusyAsync method is in the base class of View Models in XamarinViewModel class. Whenever a long lasting operation is required it should be wrapped with SetBusyAsync method in view model so that user can see a busy indicator.
Navigation Service
Navigation service implementation is done in NavigationService class. It's initialized in App.xaml.cs OnStart() method. If user is not signed in LoginView is shown as initial view, if user is already signed in then MainView is shown. MainView is NavigationPage, pages from menu are opened as detail page. In navigation service you can use these methods;
- SetMainPage sets main page as NavigationPage. You can pass a parameter object to the new page, the parameter can be retrieved in InitializeAsync() method in ViewModel. And you can set clearNavigationHistory parameter as true, to overwrite MainPage. It is useful when you want users not to see previous page with back button. Otherwise pages are being pushed into a stack and can be navigated with back button.
- SetDetailPageAsync sets detail page when current page is MasterDetailPage.
- GoBack removes the top Page from the navigation stack.
- ShowModalAsync presents a Page modally.
- CloseModalAsync dismisses the most recent modally presented Page.
Exception Handling
All exceptions are globally handled in ExceptionHandler class, LogException() method. Subscription to app wide unhandled exceptions is done in MainActivity class for Android and in AppDelegate class for iOS. However be aware that when an unhandled exception occurs, typically Android will be destroying the process. So there's not a lot can be done on the Android side, but your Xamarin code should still be able to work. So you can log the error message with a third party tool like HockeyApp Crash Reporting. Beside it's advised to keep a breakpoint in LogException() method. This is useful to see the exception before app crashes.
Pages
InitialView
InitialView is a transition page that checks whether user has any granted menu permission or not. If user has no permissions then an info message will be shown on the screen. But if user has at least one granted menu permission, it is automatically being navigated to the first authorized menu item. InitialView is being created in MainView.xaml.
Login
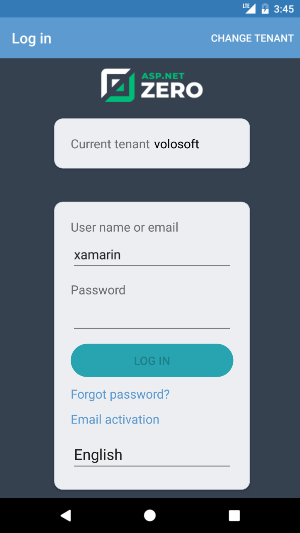
When user enters credentials AccessTokenManager authenticates user, stores access token in memory. For authentication needed Api calls, this token is being added to the request as bearer token. There's a timer in AccessTokenManager class that renews token before it expires. If an error occurs while communicating with host, client tries to reconnect within an exponentiation increasing time. After successful login user credentials are stored in device. This is for auto login (password is stored as encrypted). User information is being set in ApplicationContext so if current logon account information is needed it can be retrieved with injecting IApplicationContext.
MainView
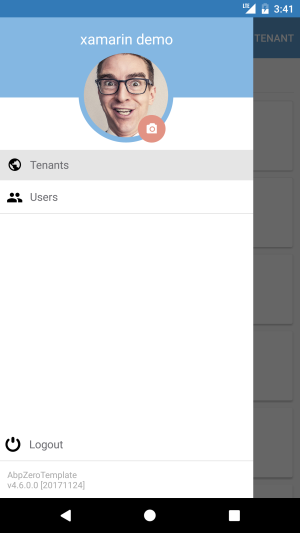
MainView is responsible for navigation service. Xamarin.Forms provides a number of different page navigation experiences, ASP.NET Zero Xamarin uses MasterDetailPage. The Xamarin.Forms MasterDetailPage is a page that manages two pages of related information a master page that presents items, and a detail page that presents details about items on the master page. When user taps hamburger menu icon, a popover is shown with menu items, logout button and profile picture. User profile picture is shown as circle image that uses ImageCirclePlugin. There is camera icon on the bottom right of the image. The icon button is implemented with Xamarin.Plugins.Iconize. When user taps the camera icon a dialog is shown to ask user whether choosing an image from gallery or taking a photo. After image retrieved, it's being routed to CropView. After cropping or rotating process, image is being sent to server.
Menu items are stored in MenuProvider class. A menu item is shown if only user has granted required permission. The menu items are being created in MainViewModel class with BuildMenuItems() method. A new menu item can be added directly to MenuProvider class.
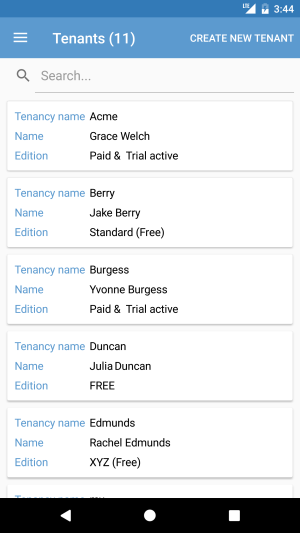
TenantsView
This page is shown if only user is a tenant owner. Page lists all tenants with a list view. There is HideableToolbarItem to create a new tenant. This toolbar item is extended control of a toolbar item that can be hidden if user has no tenant creation permission. The view model of this page is TenantsViewModel class. There is a search bar on the top that filters tenants on keypress. A limited information is shown in the list view item template. When user taps any item it navigates to the TenantDetailsView with the selected tenant object.
TenantDetailsView
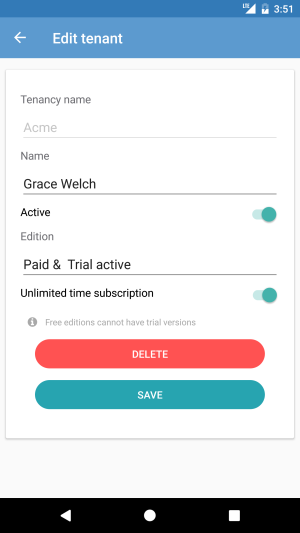
This page shows information about the selected tenant. Selected tenant model is being retrieved with navigationData object in InitializeAsync(object navigationData). There are action buttons on the bottom of the page which can be hidden if user has no permission. The permission is checked with an extension in xaml like below;
IsVisible="{extensions:HasPermission Text={x:Static permission:PermissionKey.TenantEdit}}"
Checking permission in c# classes can be done with IPermissionService class. It can be injected to the class and usage is like below;
_permissionService.HasPermission(PermissionKey.TenantDelete)
Before sending the tenant object to server, it's being validated with DataAnnotationsValidator class. If any validation error occurs, a warning is being shown to user. After tenant object is saved or deleted, tenants page is being refreshed by MessagingCenter class. See Xamarin MessasingCenter. Lastly TenantDetailsView is being popped with GoBackAsync() method of NavigationService.
UsersView
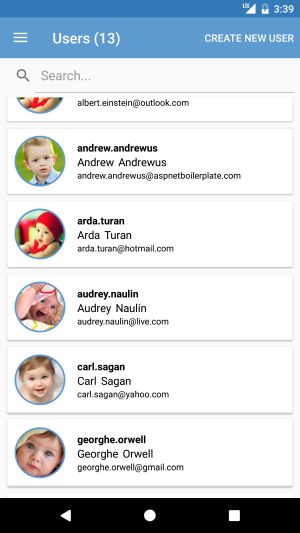
This page lists users of the tenant or tenant owner. It is only shown if the user has permission to this page. Same as tenants view, there's a search bar and a new user creation toolbar item. Profile pictures of users are shown in circle image view using Xam.Plugins.Forms.ImageCircle library. When a user is being tapped, it's navigated to UserDetailsView with the selected user.
UserDetailsView
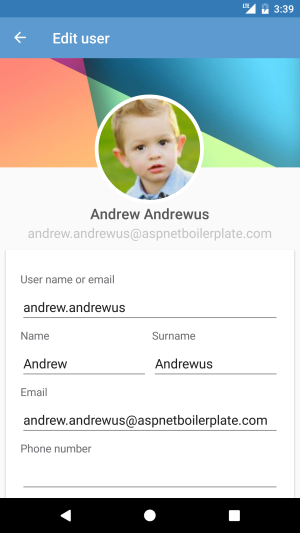
This page shows information about the selected user. If the logon user has no permission to edit then action buttons will be hidden and all inputs will be readonly. This is done in xaml with the following code;
IsEnabled="{extensions:HasPermission Text={x:Static permission:PermissionKey.UserEdit}}"
ProfilePictureView

This is for viewing user profile picture in full screen mode. When user taps the profile picture thumbnail, this view is being shown.
Distribution
Configuration
- Before publishing the application change the DefaultHostUrl in ApiUrlConfig class. how to distribute Xamarin application.
- Change all application icon files with your own app icon.
- Change all AppLogo.png files with your own app logo.
- Version your application for future updates.
Publishing
If you want to publish your application to the related application store you can read the Xamarin official guides;
Used Libraries & Frameworks
List of libraries are used to build ASP.NET Zero Xamarin project;