Social and External Logins
ASP.NET Zero supports social media logins and external logins as well. To enable one of them, we should change the following settings in appsettings.json file.
  "Authentication": {
    "Facebook": {
        "IsEnabled": "false",
        "AppId": "",
        "AppSecret": ""
    },
    "Google": {
        "IsEnabled": "false",
        "ClientId": "",
        "ClientSecret": "",
        "UserInfoEndpoint": "https://www.googleapis.com/oauth2/v2/userinfo"
    },
    "Microsoft": {
        "IsEnabled": "false",
        "ConsumerKey": "",
        "ConsumerSecret": ""
    },
    "OpenId": {
        "IsEnabled": "false",
        "ClientId": "",
        "Authority": "",
        "LoginUrl": "",
        "ValidateIssuer": "true",
        "ClaimsMapping": []
    },
    "WsFederation": {
        "IsEnabled": "false",
        "Authority": "",
        "ClientId": "",
        "Tenant": "",
        "MetaDataAddress": ""
    },
    "JwtBearer": {
        "IsEnabled": "true",
        "SecurityKey": "PhoneBook_XXXXXXXXXXXXXXXX",
        "Issuer": "PhoneBook",
        "Audience": "PhoneBook"
    }
}
ASP.NET Zero enables and configures social and external login providers in the PostInitialize method of {YourProjectName}WebHostModule.cs class. Some parts of social and externa login code is close sourced for licensing purposes in Abp.AspNetZeroCore and Abp.AspNetZeroCore.Web nuget packages.
You can find many documents on the web to learn how to obtain authentication keys for social platforms. So, we will not go to details of creating apps on social media platforms. Once you get your keys, you can write
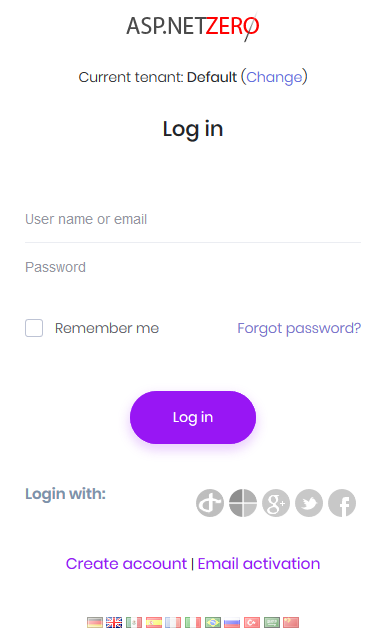
them into appsettings.json. When you enable it, social media logos are automatically shown on the login page as shown below:

Just note that, social media logins and external logins are only available on Tenant scope. So, a tenant must be selected on the login page to see those logos, otherwise there will be no logos on the login page.
OpenId Connect Login
In addition to social logins, ASP.NET Zero includes OpenId Connect Login integrated. It's configuration can be changed in appsettings.json
"OpenId": {
  "IsEnabled": "false",
  "ClientId": "",
  "Authority": "",
  "LoginUrl": "",
  "ValidateIssuer": "true",
  "ResponseType": "id_token",
  "ClaimsMapping": []
}
In some cases, OpenId Connect provider doesn't return claims we want to use. For example, Azure AD doesn't return "nameidentifier" claim but ASP.NET Core Identity uses it to find id of the user. So, in such cases, we can use ClaimsMapping to map claims of provider to custom claims. AspNet Zero will find the claim with key and will map it to internal claim with claim value in the mapping. For the following configuration, external objectidentifier will be mapped to internal nameidentifier claim.
"ClaimsMapping": [
  {
    "claim": "http://schemas.xmlsoap.org/ws/2005/05/identity/claims/nameidentifier",
    "key": "id"
  },
  {
    "claim": "http://schemas.xmlsoap.org/ws/2005/05/identity/claims/name",
    "key": "name"
  },
  {
    "claim": "http://schemas.xmlsoap.org/ws/2005/05/identity/claims/givenname",
    "key": "given_name"
  },
  {
    "claim": "http://schemas.xmlsoap.org/ws/2005/05/identity/claims/surname",
    "key": "family_name"
  },
  {
    "claim": "http://schemas.xmlsoap.org/ws/2005/05/identity/claims/emailaddress",
    "key": "email"
  }
]
If you are using Azure AD for OpenID Connect and your app is multi-tenant on Azure side, then you need to disable issuer validation, so all Azure AD users can use your app. Note that, multi-tenant app here is the one you have created oSocial logins can be enabled and configured from server-side. Once they are properly configured, they are automatically shown in the user interface.
Note that currently "ValidateIssuer" setting is not affective because the used client side library doesn't support disabling issuer validation.
WsFederation (ADFS)
ASP.NET Zero also includes ADFS login integrated. t's configuration can be changed in appsettings.json
"WsFederation": {
  "IsEnabled": "false",
  "Authority": "",
  "ClientId": "",
  "Tenant": "",
  "MetaDataAddress": ""
}
JwtBearer
ASP.NET Zero uses JwtBearer authentication by defult. It is recommended to change SecurityKey configured in appsettings.json for your production environment
IExternalLoginInfoManager interface
ASP.NET Zero allows to customize getting user's username, name and surname from claims when logging in via external login. By default there are two implementations of IExternalLoginInfoManager which are DefaultExternalLoginInfoManager and WsFederationExternalLoginInfoManager.
You can implement this class for any external login manager you want and return it the external login provider you want in ExternalLoginInfoManagerFactory.cs. After that, ASP.NET Zero will use your implementation to get username, name and surname when creating a local user record for the externally logged in user.
Angular part
All the above sections are related to server side part of ASP.NET Zero. On Angular side social and external logins are handled in login/login.service.ts. Note that currently only Facebook, Google, OpenID Connect and ADFS authentications are implemented for Angular application. Microsoft and Twitter logins are on the road map.
When you click a social login or external login icon on the login page, there are two main flows. Facebook, Google and ADFS options opens a popup window and ask user to login. In that case, callback function for the selected provider will be called right away.
However, for OpenID Connect, clicking the icon will redirect you to external website and you will login on the external website. After that, you will be redirected back to ASP.NET Zero website (to login.component.ts). Then, the callback function for OpenID Connect will be called.
All callback functions makes a request to server-side app to validate the information gathered from external or social login provider. If the information is validated, a local user record will be created (only for the first time) and user will be logged in to ASP.NET Zero website.
