Customizable Dashboard
You can create new widgets and widget filters for the customizable dashboards.
Let's create a new widget and widget filter step by step.
Pre-Note: Customizable dashboard configurations are stored in two places.
- Definitions which include permission, multitenancy side, etc. which should be controlled by the server are located in
*.Core -> DashboardCustomization -> Definitions -> DashboardConfiguration.csso that application layer can handle permission and other stuff. - View side definition like CSS JS file located in the UI project.
- UI applications get data from the server about the dashboard and use their view information to show it.
Creating a New Widget Filter
Our widget filter name will be FilterHelloWorld . It will have one input and button and it will trigger an event when that input changed.
Step 1. Create Filter View
- Go to
*.Web.Mvc -> Areas -> [YouAppAreaName] -> Views -> Shared -> Components -> CustomizableDashboard -> Widgetsand create a partial view namedFilterHelloWorldand change it as seen below.
FilterHelloWorld.cshtml
<div class="form-group filter-hello-world-container">
    <div class="input-group">
        <input type="text" class="form-control" name="input-filter-hello" placeholder="@L("SearchWithThreeDot")">
        <div class="input-group-append">
            <button class="btn btn-primary" name="btn-filter-hello" type="button">Go!</button>
        </div>
    </div>
</div>
Create folder named FilterHelloWorld into
*.Web.Mvc -> wwwroot -> view-resources -> Areas -> [YourAppAreaName] -> Views -> CustomizableDashboard -> Widgetsand createFilterHelloWorld.cssandFilterHelloWorld.jsfile for into that folder.Open
FilterHelloWorld.jsand change it as seen below.$(function () { var _$container = $(".filter-hello-world-container"); var _$btn= _$container.find("button[name='btn-filter-hello']"); var _$input= _$container.find("input[name='input-filter-hello']"); _$btn.click(function () { abp.event.trigger('app.dashboardFilters.helloFilter.onNameChange', _$input.val()); }); });
Step 2. Define Widget Filter
View Definitions
Widget's/widget filter's view consts are located in *.Core.Shared -> [YourAppName]DashboardCustomizationConsts.cs. Open [YourAppName]DashboardCustomizationConsts.cs create new id for hello world filter. (This id is also used in view page so be careful when selecting this value. It should not start with a number or special characters, etc.)
public class [YourAppName]DashboardCustomizationConsts
{
    ...
    public class Filters
    {
      ...
         public const string HelloWorldFilter = "Filters_HelloWorld";
Go to *.Web.Mvc -> Areas -> [YourAppAreaName] -> Startup -> DashboardCustomization -> DashboardViewConfiguration.cs. Add your new widget filter's view definition.
public class DashboardViewConfiguration
{
    ...
    WidgetFilterViewDefinitions.Add(
        AbpZeroTemplateDashboardCustomizationConsts.Filters.HelloWorldFilter,
        new WidgetFilterViewDefinition(
            AbpZeroTemplateDashboardCustomizationConsts.Filters.HelloWorldFilter,
            viewFileRoot + "FilterHelloWorld.cshtml",
            jsAndCssFileRoot + "FilterHelloWorld/FilterHelloWorld.min.js",
            jsAndCssFileRoot + "FilterHelloWorld/FilterHelloWorld.min.css")
  	);
	...
}
Main Definition
Go to *.Core -> DashboardCustomization -> Definitions -> DashboardConfiguration.cs and add hello world filter definition.
public class DashboardConfiguration
{
    public DashboardConfiguration()
    {
        ...
		var helloWorldFilter = new WidgetFilterDefinition(
            AbpZeroTemplateDashboardCustomizationConsts.Filters.HelloWorldFilter,
            "FilterHelloWorld"
        );

		WidgetFilterDefinitions.Add(helloWorldFilter);
        ...
Now your filter is available for all widgets. You can use it in any widget definition and it will be loaded to page automatically.
Creating a New Widget
Our widget name will be WidgetHelloWorld
Step 1. Create an API
Create an API which your widgets needs. In this scenario, I will create one endpoint into TenantDashboardAppService.cs named GetHelloWorldData.
public class GetHelloWorldInput
{
    public string Name { get; set; }
}

public class GetHelloWorldOutput
{
    public string OutPutName { get; set; }
}

public interface ITenantDashboardAppService : IApplicationService
{
  ...
  GetHelloWorldOutput GetHelloWorldData(GetHelloWorldInput input);
}

public class TenantDashboardAppService ...
{
    ...
    [AbpAuthorize(AppPermissions.HelloWorldPermission)]//check permission
    public GetHelloWorldOutput GetHelloWorldData(GetHelloWorldInput input)
    {
        return new GetHelloWorldOutput()
        {
             OutPutName = "Hello " + input.Name + " (" + Clock.Now.Millisecond + ")"
        };
    }
}
Although ASP.NET Zero load widgets by filtering permission and other things. We still have to check permission here.
Step 2. Create Widget View
- Go to
*.Web.Mvc -> Areas -> [YouAppAreaName] -> Views -> Shared -> Components -> CustomizableDashboard -> Widgetsand create a partial view namedWidgetHelloWorldand change it as seen below.
WidgetHelloWorld.cshtml
<div class="card card-custom h-100">
    <div class="card-header align-items-center border-0 mt-4">
        <div class="card-title">
            <span class="card-icon">
                <i class="la la-pie-chart text-success"></i>
            </span>
            <h3 class="card-label">
                <span class="font-weight-bolder text-dark">@L("HelloWorld")</span>
                <small class="sub-title"></small>
            </h3>
        </div>
    </div>

    <div class="card-body">
        Hello World Works! <br/>
        Response: <span class="hello-response">NULL</span>
    </div>
</div>
- Create a folder named HelloWorld into
*.Web.Mvc -> wwwroot -> view-resources -> Areas -> [YourAppAreaName] -> Views -> CustomizableDashboard -> Widgetsand createHelloWorld.cssandHelloWorld.jsfile for into that folder.
- Open
HelloWorld.jsand change it as seen below.
(function () {
    //Widgets_Tenant_HelloWorld must match with the WidgetViewDefinition name defined in Step 3.
    app.widgets.Widgets_Tenant_HelloWorld = function () {
        var _tenantDashboardService = abp.services.app.tenantDashboard;
        var _widgetBase = app.widgetBase.create();
        var _widget;

		this.init = function (widgetManager) {
			_widget = widgetManager.getWidget();
			_widgetBase.runDelayed(function(){
				getHelloWorld("First Attempt");
			});

			//event which your filter send
			abp.event.on('app.dashboardFilters.helloFilter.onNameChange', function (name) {
				_widgetBase.runDelayed(function(){
					getHelloWorld(name);
				});
			});
		};

		var getHelloWorld = function (name) {
			abp.ui.setBusy(_widget);
			_tenantDashboardService.getHelloWorldData({name:name})
				.done(function (result) {
					_widget.find(".hello-response")//it is how you should select item in widget
					.text(result.outPutName);
				}).always(function () {
					abp.ui.clearBusy(_widget);
				});
		};
    }
})();
Step 3. Define Widget
View Definitions
Widget's/widget filter's view consts are located in *.Core.Shared -> [YourAppName]DashboardCustomizationConsts.cs . Open *DashboardCustomizationConsts.cs create new id for hello world widget. (This id is also used in view page so be careful when selecting this value. It should not start with a number or special characters, etc.)
public class [YourAppName]DashboardCustomizationConsts
{
    public class Widgets
    {
        public class Tenant
        {
            public const string HelloWorld = "Widgets_Tenant_HelloWorld";
      ...
Go to *.Web.Mvc -> Areas -> [YourAppAreaName] -> Startup -> DashboardCustomization -> DashboardViewConfiguration.cs. Add your hello world widget's view definition.
public class DashboardViewConfiguration
{
    ...
	WidgetViewDefinitions.Add(AbpZeroTemplateDashboardCustomizationConsts.Widgets.Tenant.DailySales,
		new WidgetViewDefinition(
			AbpZeroTemplateDashboardCustomizationConsts.Widgets.Tenant.HelloWorld,
			"AppAreaName/Widgets/WidgetHelloWorld",//widget url
			"/Areas/AppAreaName/Views/CustomizableDashboard/Widgets/HelloWorld/HelloWorld.min.js", //widget's js file
			"/Areas/AppAreaName/Views/CustomizableDashboard/Widgets/HelloWorld/HelloWorld.min.css"
		)
	);
}
Main Definition
Go to *.Core -> DashboardCustomization -> Definitions -> DashboardConfiguration.cs and add hello world widget's definition.
public class DashboardConfiguration
{
    public DashboardConfiguration()
    {
        ...
        var helloWorld = new WidgetDefinition(
            id: AbpZeroTemplateDashboardCustomizationConsts.Widgets.Tenant.HelloWorld,
            name: "WidgetHelloWorld",//localized string key
            side: MultiTenancySides.Tenant,
            usedWidgetFilters: new List<string>() { helloWorldFilter.Id },// you can use any filter you need
            permissions: tenantWidgetsDefaultPermission
        );

		helloWorld.Permissions.Add(AppPermissions.HelloWorldPermission);
        ...

        ...
        var defaultTenantDashboard = new DashboardDefinition(
            AbpZeroTemplateDashboardCustomizationConsts.DashboardNames.DefaultTenantDashboard,
            new List<string>()
            {
                generalStats.Id,
                dailySales.Id,
                profitShare.Id,
                memberActivity.Id,
                regionalStats.Id,
                topStats.Id,
                salesSummary.Id,
                helloWorld.Id //add your widgets to dashboard
            }
        );
        ...
    }
}
After all of these, open any terminal and run npm run create-bundles command in *.Web.Mvc project folder. This will create all minified CSS and JS files we defined.
After that you will be able to use your new widget.
Resize Event
You can subscribe to resize event of a widget. This event is triggered when a widget is resized. You can use this event to update your widget's content.
(function () {
  app.widgets.Widgets_MyWidget = function () {
    var _widget;
    this.init = function (widgetManager) {
      _widget = widgetManager.getWidget();
    };

   //Add that function to your widget's script. It will be triggered for the one which was resized even if you have multiple Widgets_MyWidget in your page.
    this.onResizeCompleted = function () {
      //todo: reload graph or something.
      console.log('resize completed');
    }
  };
})();
Usage
Since we create tenant side widget, open tenant dashboard.
Select the page you want to use hello widget.
Add hello widget to the page as described in that article: Customizable Dashboard Usage
After that, you will see that your widget is located on the page and works as expected.

Since hello world widget needs hello world filter (we defined it in DashboardConfiguration) hello world filter will be loaded to the page. To use it. Click the filter button next to the Edit Mode button. It will open the filter modal.
As you can below, you will be able to see filters that your widgets need. Change input and click Go. Hello world widget will be changed by your filter.

Changing Default Dashboard View
AspNet Zero uses gridstack grid system in dashboard and stores needed view data in app settings. To change default view of dashboard you should change related part of the settings located in AppSettingProvider. To change default dashboard view you should open dashboard and design the dashboard by following the document . Then open browser's developer console. Click to the save button in the page and follow the request named SavePage.

Open the request payload and get the data from there
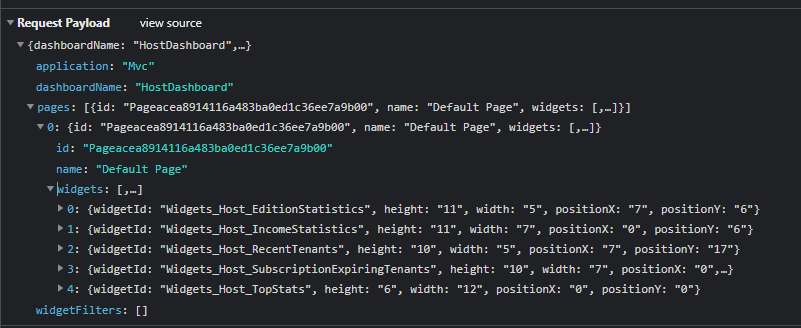
Then go to AppSettingProvider's GetDefaultAngularDashboardViews method and change the information with using the data you get from request payload.