
Customizable Dashboard
You can create new widgets and widget filters for the customizable dashboards.
Let's create a new widget and widget filter step by step.
Pre-Note: Dashboard Configuration Locations
Customizable dashboard configurations are stored in two places:
- Server-side definitions (permissions, multi-tenancy side, etc.) are located in
*.Core -> DashboardCustomization -> Definitions -> DashboardConfiguration.csso the application layer can handle permissions and other server-side logic. - View-side definitions (React components) are located in the React project under
src/pages/admin/dashboard/. - UI applications get data from the server about the dashboard and use their view information to render it.
Creating a New Widget Filter
Our widget filter name will be FilterHelloWorld. It will have one input and a button, and it will trigger an event when the input changes.
Step 1. Create Filter Component
Open the React project.
Go to
src/pages/admin/dashboard/components/filters/and create a new folder namedfilter-hello-world/.Create
index.tsxinside the folder:
src/pages/admin/dashboard/components/filters/filter-hello-world/index.tsx
import React, { useState, useCallback } from "react";
import { Input, Button, Space } from "antd";
import L from "@/lib/L";

interface FilterHelloWorldProps {
  onFilterChange?: (name: string) => void;
}

const FilterHelloWorld: React.FC<FilterHelloWorldProps> = ({ onFilterChange }) => {
  const [inputValue, setInputValue] = useState("");

  const handleClick = useCallback(() => {
    // Trigger custom event for widgets to listen to
    window.dispatchEvent(
      new CustomEvent("dashboard:helloFilter:nameChange", {
        detail: { name: inputValue },
      })
    );
    onFilterChange?.(inputValue);
  }, [inputValue, onFilterChange]);

  return (
    <div className="form-group">
      <Space.Compact style={{ width: "100%" }}>
        <Input
          value={inputValue}
          onChange={(e) => setInputValue(e.target.value)}
          placeholder={L("SearchWithThreeDot")}
        />
        <Button type="primary" onClick={handleClick}>
          Go!
        </Button>
      </Space.Compact>
    </div>
  );
};

export default FilterHelloWorld;
Step 2. Define Widget Filter
View Definitions
- Open
src/pages/admin/dashboard/customizable-dashboard/types.tsand add the new filter ID:
export const DashboardCustomizationConst = {
  // ... existing code ...
  filters: {
    filterDateRangePicker: "Filters_DateRangePicker",
    filterHelloWorld: "Filters_HelloWorld", // Add new filter ID
  },
  // ... existing code ...
} as const;
- Open
src/pages/admin/dashboard/hooks/useDashboardConfiguration.tsxand add your filter's view definition:
import FilterHelloWorld from "../components/filters/filter-hello-world";

export function useDashboardConfiguration(): DashboardViewConfigurationService {
  return useMemo(() => {
    const widgetFilterDefinitions: WidgetFilterViewDefinition[] = [
      {
        id: DashboardCustomizationConst.filters.filterDateRangePicker,
        component: FilterDateRangePicker,
      },
      // Add your new filter
      {
        id: DashboardCustomizationConst.filters.filterHelloWorld,
        component: FilterHelloWorld,
      },
    ];
    // ... rest of the code
  }, []);
}
Server Side Definition
Open your server project.
Open
*.Core.Shared -> [YourAppName]DashboardCustomizationConsts.csand define the same ID:
public class [YourAppName]DashboardCustomizationConsts
{
    public class Filters
    {
        public const string HelloWorldFilter = "Filters_HelloWorld";
        // ... other filters
    }
}
- Go to
*.Core -> DashboardCustomization -> Definitions -> DashboardConfiguration.csand add the filter definition:
public class DashboardConfiguration
{
    public DashboardConfiguration()
    {
        var helloWorldFilter = new WidgetFilterDefinition(
            AbpZeroTemplateDashboardCustomizationConsts.Filters.HelloWorldFilter,
            "FilterHelloWorld" // localized string key
        );

        WidgetFilterDefinitions.Add(helloWorldFilter);
    }
}
Now your filter is available for all widgets. You can use it in any widget definition and it will be loaded to the page automatically.
Creating a New Widget
Our widget name will be WidgetHelloWorld.
Step 1. Create an API
Create an API endpoint that your widget needs. In this scenario, we will create one endpoint in TenantDashboardAppService.cs named GetHelloWorldData.
public class GetHelloWorldInput
{
    public string Name { get; set; }
}

public class GetHelloWorldOutput
{
    public string OutPutName { get; set; }
}

public interface ITenantDashboardAppService : IApplicationService
{
    GetHelloWorldOutput GetHelloWorldData(GetHelloWorldInput input);
}

public class TenantDashboardAppService : ...
{
    [AbpAuthorize(AppPermissions.HelloWorldPermission)] // check permission
    public GetHelloWorldOutput GetHelloWorldData(GetHelloWorldInput input)
    {
        return new GetHelloWorldOutput()
        {
            OutPutName = "Hello " + input.Name + " (" + Clock.Now.Millisecond + ")"
        };
    }
}
Although ASP.NET Zero loads widgets by filtering permissions, we still must check permissions here.
After you create the API, run the *.Web.Host project, then go to the nswag folder in the React project. Open a terminal and run:
npm run nswag
Step 2. Create Widget Component
Open the React project.
Go to
src/pages/admin/dashboard/components/widgets/and create a new folder namedhello-world/.Create
index.tsxinside the folder:
src/pages/admin/dashboard/components/widgets/hello-world/index.tsx
import React, { useEffect, useState, useCallback } from "react";
import { Card } from "antd";
import { TenantDashboardServiceProxy } from "@api/generated/service-proxies";
import { useServiceProxy } from "@/api/service-proxy-factory";

const WidgetHelloWorld: React.FC = () => {
  const tenantDashboardService = useServiceProxy(TenantDashboardServiceProxy, []);
  const [helloResponse, setHelloResponse] = useState<string>("");

  const getHelloWorld = useCallback(
    async (name: string) => {
      const data = await tenantDashboardService.getHelloWorldData(name);
      setHelloResponse(data.outPutName ?? "");
    },
    [tenantDashboardService]
  );

  // Initial load
  useEffect(() => {
    getHelloWorld("First Attempt");
  }, [getHelloWorld]);

  // Subscribe to filter events
  useEffect(() => {
    const handleNameChange = (event: CustomEvent<{ name: string }>) => {
      getHelloWorld(event.detail.name);
    };

    window.addEventListener(
      "dashboard:helloFilter:nameChange",
      handleNameChange as EventListener
    );

    return () => {
      window.removeEventListener(
        "dashboard:helloFilter:nameChange",
        handleNameChange as EventListener
      );
    };
  }, [getHelloWorld]);

  return (
    <Card title="Hello World" className="h-100">
      <div>
        Hello World Works! <br />
        Response: {helloResponse}
      </div>
    </Card>
  );
};

export default WidgetHelloWorld;
Step 3. Define Widget
View Definitions
- Open
src/pages/admin/dashboard/customizable-dashboard/types.tsand add your widget ID:
export const DashboardCustomizationConst = {
  widgets: {
    tenant: {
      // ... existing widgets ...
      helloWorld: "Widgets_Tenant_HelloWorld", // Add new widget ID
    },
    host: {
      // ... existing widgets ...
    },
  },
  // ... rest of the code
} as const;
- Open
src/pages/admin/dashboard/hooks/useDashboardConfiguration.tsxand add your widget's view definition:
import WidgetHelloWorld from "../components/widgets/hello-world";

export function useDashboardConfiguration(): DashboardViewConfigurationService {
  return useMemo(() => {
    // ... filter definitions ...

    const WidgetViewDefinitions: WidgetViewDefinition[] = [
      // ... existing widgets ...

      // Add your new widget
      {
        id: DashboardCustomizationConst.widgets.tenant.helloWorld,
        component: WidgetHelloWorld,
        defaultWidth: 6,
        defaultHeight: 8,
      },
    ];

    return { WidgetViewDefinitions, widgetFilterDefinitions };
  }, []);
}
Server Side Definition
Open your server project.
Open
*.Core.Shared -> [YourAppName]DashboardCustomizationConsts.csand define the same ID:
public class [YourAppName]DashboardCustomizationConsts
{
    public class Widgets
    {
        public class Tenant
        {
            public const string HelloWorld = "Widgets_Tenant_HelloWorld";
            // ... other widgets
        }
    }
}
- Go to
*.Core -> DashboardCustomization -> Definitions -> DashboardConfiguration.csand add the widget definition:
public class DashboardConfiguration
{
    public DashboardConfiguration()
    {
        // ... existing code ...

        var helloWorld = new WidgetDefinition(
            id: AbpZeroTemplateDashboardCustomizationConsts.Widgets.Tenant.HelloWorld,
            name: "WidgetHelloWorld", // localized string key
            side: MultiTenancySides.Tenant,
            usedWidgetFilters: new List<string>() { helloWorldFilter.Id },
            permissions: tenantWidgetsDefaultPermission
        );

        helloWorld.Permissions.Add(AppPermissions.HelloWorldPermission);

        // Add widget to dashboard
        var defaultTenantDashboard = new DashboardDefinition(
            AbpZeroTemplateDashboardCustomizationConsts.DashboardNames.DefaultTenantDashboard,
            new List<string>()
            {
                generalStats.Id, dailySales.Id, profitShare.Id, memberActivity.Id,
                regionalStats.Id, topStats.Id, salesSummary.Id,
                helloWorld.Id // Add your widget to dashboard
            }
        );
    }
}
After that, you will be able to use your new widget.
Handling Widget Resize Events
If your widget contains charts or content that needs to rerender on resize, you can listen to the grid layout resize events.
In React, you can use the ResizeObserver API or listen to window resize events:
import React, { useEffect, useRef } from "react";

const WidgetWithResize: React.FC = () => {
  const containerRef = useRef<HTMLDivElement>(null);

  useEffect(() => {
    const container = containerRef.current;
    if (!container) return;

    const resizeObserver = new ResizeObserver((entries) => {
      for (const entry of entries) {
        console.log("Widget resized:", entry.contentRect);
        // TODO: Reload chart or recalculate layout
      }
    });

    resizeObserver.observe(container);

    return () => {
      resizeObserver.disconnect();
    };
  }, []);

  return (
    <div ref={containerRef} className="h-100">
      {/* Your widget content */}
    </div>
  );
};

export default WidgetWithResize;
Usage
Since we created a tenant-side widget, open the tenant dashboard.
Select the page you want to use hello widget.
Add hello widget to the page as described in that article: Customizable Dashboard Usage
Click the Edit Mode button to enable dashboard editing, then add your "Hello World" widget to the page.

After that, you will see that your widget is located on the page and works as expected.

Since hello world widget needs hello world filter (we defined it in DashboardConfiguration) hello world filter will be loaded to the page. To use it. Click the filter button next to the Edit Mode button. It will open the filter modal.
As you can below, you will be able to see filters that your widgets need. Change input and click Go. Hello world widget will be changed by your filter.

Changing Default Dashboard View
ASP.NET Zero uses react-grid-layout for the dashboard grid system and stores view data in app settings.
To change the default view of the dashboard:
- Open the dashboard and design it by adding/arranging widgets
- Open the browser's developer console (F12)
- Click the Save button on the page
- In the Network tab, find the
SavePagerequest

- Open the request payload and copy the data
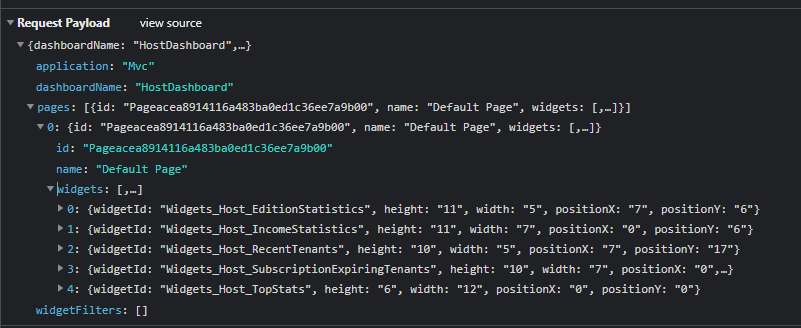
- Go to
AppSettingProvider.csin your*.Coreproject and find theGetDefaultReactDashboardViewsmethod - Update the default layout data with the data you copied from the request payload
Summary of Files to Create/Modify
| Action | File Path |
|---|---|
| Create | src/pages/admin/dashboard/components/filters/filter-hello-world/index.tsx |
| Create | src/pages/admin/dashboard/components/widgets/hello-world/index.tsx |
| Modify | src/pages/admin/dashboard/customizable-dashboard/types.ts |
| Modify | src/pages/admin/dashboard/hooks/useDashboardConfiguration.tsx |