
Migration Guide: Transitioning from ASP.NET Boilerplate to ASP.NET Zero
This is a step-by-step guide to migrate your React application from ASP.NET Boilerplate to ASP.NET Zero.
Introduction
The purpose of this migration guide is to provide a comprehensive, step-by-step process for migrating from ASP.NET Boilerplate to ASP.NET Zero in the context of an React application. This guide aims to help developers understand the differences between the two applications, ensure a smooth migration, and leverage the advanced features of ASP.NET Zero to improve application performance and maintainability.
Creating and Migrating Entities
Let's consider an entity called Book that was previously created in an ASP.NET Boilerplate application as follows:
public class Book : Entity<long>, IHasCreationTime
{
    public string Name { get; set; }
    public string Description { get; set; }
    public DateTime CreationTime { get; set; }

    public Book()
    {
        CreationTime = Clock.Now;
    }
}
Transitioning to ASP.NET Zero
When migrating this entity to ASP.NET Zero, you can create a new class within the *.Core project, just like you did in your ASP.NET Boilerplate application. This ensures consistency and simplifies integration into your ASP.NET Zero solution.
Configuring DbContext
To integrate the *DbContext added entity in ASP.NET Boilerplate into ASP.NET Zero, add it to the *DbContext class in the *.EntityFrameworkCore project as shown below:
public class AngularProjectDemoDbContext : AbpZeroDbContext<Tenant, Role, User, AngularProjectDemoDbContext>, IOpenIddictDbContext
{
    /* Define an DbSet for each entity of the application */

    public virtual DbSet<Book> Books { get; }

    ...

    public AngularProjectDemoDbContext(DbContextOptions<AngularProjectDemoDbContext> options)
        : base(options)
    {
    }

    ...
}
Database Migrations
To add the entity added to the *DbContext to the database table, first, we need to create a migration. You can follow the exact same steps applied in ASP.NET Boilerplate using the Package Manager Console. After opening it, select the project to be applied in the Default Project section and create a migration with the specified command.
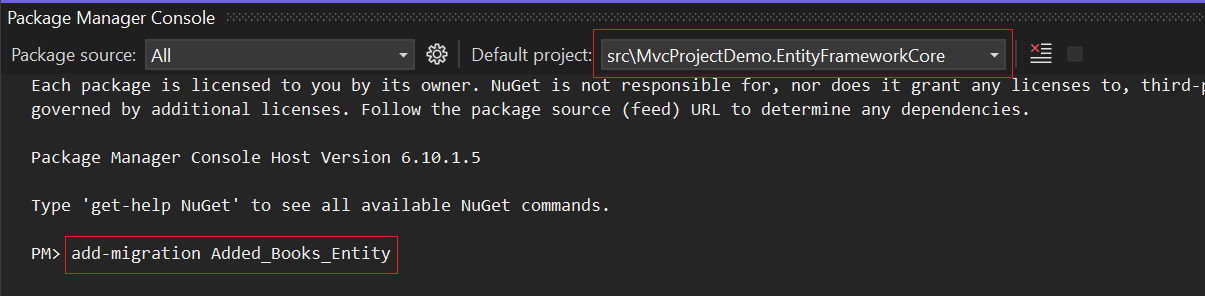
After applying this command, it is sufficient to apply the following command to reflect the created migration to the database.

Migrating Databases Between Applications
When transitioning from an ASP.NET Boilerplate application to an ASP.NET Zero application, it is essential to consider how the database migration will be handled. Since both frameworks typically use Microsoft SQL Server (MSSQL) as the database management system, the migration process can be streamlined by leveraging existing migration tools and practices. Given that both frameworks utilize the ABP framework, many of the tables will have similar characteristics, which simplifies the migration process.
Here are the key steps to ensure a smooth database migration:
Analyze Existing Database Schema: Start by analyzing the existing database schema in the ASP.NET Boilerplate application. Identify the entities, relationships, and constraints that need to be migrated.
Generate Migrations in ASP.NET Zero: Use the Entity Framework Core migration tools to generate the necessary migrations in the ASP.NET Zero application. This involves creating an initial migration that mirrors the existing database schema.
Data Migration: Ensure that data is accurately migrated from the ASP.NET Boilerplate database to the ASP.NET Zero database.
Test the Migration: Thoroughly test the migration process in a staging environment. Verify that all entities and data have been correctly migrated and that the application functions as expected.
For more detailed information and best practices on using Entity Framework Core with MSSQL, refer to the official Microsoft documentation on SQL Server migration and copying databases. Additionally, this guide provides a comprehensive overview of different methods to copy tables between databases in SQL Server, offering practical examples and steps.
When migrating data from an ASP.NET Boilerplate database to an ASP.NET Zero database, ensure that all existing data is accurately transferred. Testing the migration process in a staging environment is crucial to ensure that the migration is successful and that the application functions as expected after the migration.
Implementing Application Services
This chapter covers the implementation of application services in ASP.NET Zero, focusing on creating service interfaces, DTOs (Data Transfer Objects), and their associated services class.
Creating DTOs and Defining AppService Interfaces
In this section, creating application service classes requires defining necessary interfaces and DTOs. Similar to ASP.NET Boilerplate, however, interfaces and DTOs created here will be managed in the *.Application.Shared project instead of *.Application for easier organization and accessibility.
IBookAppService manages general CRUD operations for the Book entity, defined with the following method signatures:
public interface IBookAppService: IApplicationService
{
    Task<ListResultDto<BookListDto>> GetBooks(GetBooksInput input);

    Task<GetBookForEditOutput> GetBookForEdit(NullableIdDto input);

    Task CreateOrUpdateBook(CreateOrUpdateBookInput input);

    Task DeleteBook(EntityDto input);
}
In ASP.NET Zero, DTOs like CreateOrUpdateBookInput, GetBooksInput, BookListDto, and GetBookForEditOutput are typically organized under the *.Application.Shared project, specifically under a folder structure such as Books/Dto.
You can also use the same dto structure that you created in ASP.NET Boilerplate in the ASP.NET Zero application.
Like ASP.NET Boilerplate, you can create interfaces in ASP.NET Zero in a similar way.
Object Mapping
ASP.NET Zero uses Mapperly for object-to-object mappings, which generates mapping code at compile-time. Unlike AutoMapper used in ASP.NET Boilerplate, Mapperly provides better performance and compile-time safety.
Creating Mapperly Mappers
For each entity, create a mapper class in the *.Application project under a Mappers folder:
using Riok.Mapperly.Abstractions;
using YourNamespace.Books;
using YourNamespace.Books.Dto;

namespace YourNamespace.Application.Mappers
{
    [Mapper]
    public partial class BookMapper
    {
        // Entity to DTO mappings
        public partial BookListDto Map(Book source);
        public partial BookEditDto MapToEditDto(Book source);

        // DTO to Entity mappings
        public partial Book Map(BookEditDto source);

        // List mappings
        public partial List<BookListDto> MapList(List<Book> source);
    }
}
Mapperly will automatically generate the implementation of these methods at compile-time. The ObjectMapper.Map<T>() API in your application services will continue to work seamlessly, as ASP.NET Zero automatically discovers and uses your Mapperly mapper classes.
For more details on migrating from AutoMapper to Mapperly, see Migrating from AutoMapper to Mapperly.
Managing Permissions
In ASP.NET Zero applications, it is important to manage permissions, as in ASP.NET Boilerplate, to control access to various features and functions within the application. Permissions are typically defined as constants in a central static class called AppPermissions.
public static class AppPermissions
{
    ...

    public const string Pages_Administration_Books = "Pages.Administration.Books";
    public const string Pages_Administration_Books_Create = "Pages.Administration.Books.Create";
    public const string Pages_Administration_Books_Edit = "Pages.Administration.Books.Edit";
    public const string Pages_Administration_Books_Delete = "Pages.Administration.Books.Delete";

    ...
}
In ASP.NET Zero applications, one distinction from ASP.NET Boilerplate in app service classes lies in CRUD operations where permission control is managed. Here, to access general app service functionality, a permission named Pages_Administration_Books is created, encompassing permissions for Create, Edit, and Delete operations. For these methods, separate permission checks can optionally be applied in ASP.NET Boilerplate applications as well. This approach aims to facilitate easier management and controlled access, emphasizing structured handling of permissions.
Implementing App Service Classes
Create an app service class created in an *.Application project, as created in ASP.NET Boilerplate, that will implement the IBookAppService interface.
 [AbpAuthorize(AppPermissions.Pages_Administration_Books)]
 public class BookAppService : AngularProjectDemoAppServiceBase, IBookAppService
 {
     private readonly IRepository<Book, long> _bookRepository;

     public BookAppService(IRepository<Book, long> bookRepository)
     {
         _bookRepository = bookRepository;
     }

     public async Task CreateOrUpdateBook(CreateOrUpdateBookInput input)
     {
         if (input.Book.Id.HasValue)
         {
             await UpdateBookAsync(input);
         }
         else
         {
             await CreateBookAsync(input);
         }
     }


     [AbpAuthorize(AppPermissions.Pages_Administration_Books_Delete)]
     public async Task DeleteBook(EntityDto input)
     {
         var book = await _bookRepository.GetAsync(input.Id);

         await _bookRepository.DeleteAsync(book);
     }


     [AbpAuthorize(AppPermissions.Pages_Administration_Books_Create, AppPermissions.Pages_Administration_Books_Edit)]
     public async Task<GetBookForEditOutput> GetBookForEdit(NullableIdDto input)
     {
         BookEditDto bookListDto;

         if (input.Id.HasValue)
         {
             var book = await _bookRepository.GetAsync(input.Id.Value);
             bookListDto = ObjectMapper.Map<BookEditDto>(book);
         }
         else
         {
             bookListDto = new BookEditDto();
         }

         return new GetBookForEditOutput
         {
             Book = bookListDto
         };
     }

     [HttpPost]
     public async Task<ListResultDto<BookListDto>> GetBooks(GetBooksInput input)
     {
         var query = _bookRepository.GetAll();

         query = query
             .WhereIf(!input.Filter.IsNullOrEmpty(),
                 b => b.Name.Contains(input.Filter)
             );

         var books = await query.ToListAsync();

         return new ListResultDto<BookListDto>(ObjectMapper.Map<List<BookListDto>>(books));
     }

     [AbpAuthorize(AppPermissions.Pages_Administration_Books_Edit)]
     protected virtual async Task UpdateBookAsync(CreateOrUpdateBookInput input)
     {
         var book = await _bookRepository.GetAsync(input.Book.Id.Value);
         book.Name = input.Book.Name;
         book.Description = input.Book.Description;
     }

     [AbpAuthorize(AppPermissions.Pages_Administration_Books_Create)]
     protected virtual async Task CreateBookAsync(CreateOrUpdateBookInput input)
     {
         var book = ObjectMapper.Map<Book>(input.Book);

         await _bookRepository.InsertAsync(book);
     }
 }
This BookAppService class demonstrates how CRUD operations for books are implemented in an ASP.NET Zero application, following a straightforward approach similar to ASP.NET Boilerplate.
Navigation and Page Management
In ASP.NET Zero React, routes are defined in src/routes/AppRouter.tsx. This file uses React Router to define all application routes with lazy loading for better performance.
Adding a New Route (ASP.NET Zero React)
// In src/routes/AppRouter.tsx

// Import your component with lazy loading
const BooksPage = React.lazy(
  () => import("@/pages/admin/books/index")
);

// Add the route inside the Routes component
<Route
  path="admin/books"
  element={
    <ProtectedRoute permission="Pages.Administration.Books">
      <BooksPage />
    </ProtectedRoute>
  }
/>
Adding Navigation Menu Items
To add navigation items, modify the buildRawMenu function in src/lib/navigation/appNavigation.tsx:
appNavigation.tsx (ASP.NET Zero React)
export const buildRawMenu = (): AppMenuItem[] => [
  // ... existing items
  {
    id: "Books",
    title: L("Books"),
    permissionName: "Pages.Administration.Books",
    icon: "book",
    route: "/app/admin/books",
  },
  // ... more items
];
The AppMenuItem interface includes:
id: Unique identifiertitle: Display name (useL()for localization)permissionName: Required permission to show this menu itemicon: Keenicons icon nameroute: React Router path
Building the User Interface
The pages and modals created here show similar features. Since ASP.NET Zero uses the Metronic theme, it is recommended that you review Metronic Theme to adapt it.
Creating Components
In ASP.NET Zero React, you create pages as React functional components. Unlike ASP.NET Boilerplate which uses Angular modules, React uses a simple file-based structure with components organized in folders.
Creating a Books Page (ASP.NET Zero React)
Create your page component at src/pages/admin/books/index.tsx:
import { useState, useEffect } from "react";
import { Button, Table, Modal, message } from "antd";
import { useServiceProxy } from "@/api/service-proxy-factory";
import { usePermissions } from "@/hooks/usePermissions";
import { L } from "@/lib/L";
import CreateOrEditBookModal from "./components/CreateOrEditBookModal";

export default function BooksPage() {
  const [loading, setLoading] = useState(false);
  const [data, setData] = useState<BookDto[]>([]);
  const [isModalOpen, setIsModalOpen] = useState(false);
  const [selectedBookId, setSelectedBookId] = useState<number | undefined>();

  const { bookService } = useServiceProxy();
  const { isGranted } = usePermissions();

  const fetchBooks = async () => {
    setLoading(true);
    try {
      const result = await bookService.getAll({});
      setData(result.items || []);
    } finally {
      setLoading(false);
    }
  };

  useEffect(() => {
    fetchBooks();
  }, []);

  const handleDelete = async (id: number) => {
    Modal.confirm({
      title: L("AreYouSure"),
      onOk: async () => {
        await bookService.delete({ id });
        message.success(L("SuccessfullyDeleted"));
        fetchBooks();
      },
    });
  };

  return (
    <div className="card">
      <div className="card-header">
        <h3>{L("Books")}</h3>
        {isGranted("Pages.Administration.Books.Create") && (
          <Button type="primary" onClick={() => setIsModalOpen(true)}>
            {L("CreateNewBook")}
          </Button>
        )}
      </div>
      <div className="card-body">
        <Table dataSource={data} loading={loading} rowKey="id">
          {/* Define your columns */}
        </Table>
      </div>

      <CreateOrEditBookModal
        bookId={selectedBookId}
        open={isModalOpen}
        onClose={() => {
          setIsModalOpen(false);
          setSelectedBookId(undefined);
        }}
        onSaved={() => {
          setIsModalOpen(false);
          setSelectedBookId(undefined);
          fetchBooks();
        }}
      />
    </div>
  );
}
Key Differences from ASP.NET Boilerplate
| Feature | ASP.NET Boilerplate (Angular) | ASP.NET Zero React |
|---|---|---|
| UI Library | Bootstrap, ngx-bootstrap | Ant Design |
| Modals | BsModalService | Ant Design Modal component |
| Tables | HTML tables | Ant Design Table with built-in pagination |
| Notifications | abp.message, abp.notify | Ant Design message, Modal.confirm |
| Permissions | Angular guards | usePermissions() hook |
| State Management | Component state | React hooks + Redux Toolkit |
| File Structure | Modules with routing | File-based pages in src/pages/ |
Creating Modal Components
In ASP.NET Zero React, create and edit operations are typically handled in a single modal component:
CreateOrEditBookModal.tsx
import { useEffect } from "react";
import { Modal, Form, Input, message } from "antd";
import { useServiceProxy } from "@/api/service-proxy-factory";
import { L } from "@/lib/L";

interface Props {
  bookId?: number;
  open: boolean;
  onClose: () => void;
  onSaved: () => void;
}

export default function CreateOrEditBookModal({ bookId, open, onClose, onSaved }: Props) {
  const [form] = Form.useForm();
  const { bookService } = useServiceProxy();
  const isEditMode = !!bookId;

  useEffect(() => {
    if (open && bookId) {
      // Fetch and populate form for editing
      bookService.getForEdit({ id: bookId }).then((result) => {
        form.setFieldsValue(result);
      });
    } else {
      form.resetFields();
    }
  }, [open, bookId]);

  const handleSave = async () => {
    const values = await form.validateFields();
    if (isEditMode) {
      await bookService.update({ ...values, id: bookId });
    } else {
      await bookService.create(values);
    }
    message.success(L("SavedSuccessfully"));
    onSaved();
  };

  return (
    <Modal
      title={isEditMode ? L("EditBook") : L("CreateNewBook")}
      open={open}
      onCancel={onClose}
      onOk={handleSave}
    >
      <Form form={form} layout="vertical">
        <Form.Item name="name" label={L("Name")} rules={[{ required: true }]}>
          <Input />
        </Form.Item>
        {/* Add more form fields */}
      </Form>
    </Modal>
  );
}
Adding Localization
As in ASP.NET Boilerplate, localization resources in ASP.NET Zero are created under the *.Core project within the Localization folder. In ASP.NET Zero, the source files are located in a folder named after your project, such as AngularProjectDemo. You can add entries to the AngularProjectDemo.xml file or any other language file as shown below:
<localizationDictionary culture="en">
  <texts>
    ...
    <text name="Books">Books</text>
    <text name="BooksHeaderInfo">Books Header Info</text>
    <text name="CreateNewBook">Create New Book</text>
  </texts>
</localizationDictionary>
Implementing Unit Tests
Unit tests implemented in ASP.NET Boilerplate show minor changes in ASP.NET Zero.
Main Differences:
ASP.NET Boilerplate: More manual setup with Effort and custom fixtures. ASP.NET Zero: Uses ASP.NET Core’s DI and in-memory database providers for simpler and more consistent setup.
ASP.NET Boilerplate: Uses Effort for simulating an in-memory database. ASP.NET Zero: Uses SQL Server or Entity Framework Core’s in-memory database for easier configuration.
Transition Steps:
- Transition from base class TestBase to AppTestBase provided by ASP.NET Zero.
- Replace Effort with Entity Framework Core’s in-memory database provider.
- Ensure dependencies are resolved using ASP.NET Core’s DI framework.
- Adapt test methods to utilize ASP.NET Zero’s testing utilities and patterns.
Conclusion
The migration from ASP.NET Boilerplate to ASP.NET Zero involves several important transitions in various aspects of application development. This process includes changes in the management of models, configuration of app services and unit tests. ASP.NET Zero offers advanced features that increase efficiency and scalability by providing a more integrated and streamlined approach to these elements.